Extending Sportster xl1200s Sport model adjustable forks

Collapse

Desktop Ad Forum Top

Collapse

Mobile ad top forum

Collapse
X
 
  • Time
  • Show
Clear All
new posts
  • chopnscoot
    Junior Member
    • Jul 2019
    • 3

    Extending Sportster xl1200s Sport model adjustable forks

    Hey guys,
    I have a 1996 Sportster 1200s Sport model with the adjustable front forks, dual disks and all that and I am wanting to extend my front end (probably going +6 over) and was wondering what needs to be done to make it happen. I've done some searching but haven't found much. I am assuming I will have to buy all new spring internals to replace the adjustable cartridge internals? I don't mind losing the front end adjustability if necessary but do want to keep the dual disk setup. Are the stock lowers on the Sport model going to be compatible with normal spring internals? Has anyone here extended the adjustable Sport model forks before?
    Thanks for any help you guys can provide.
  • TriNortchopz
    Senior Member
    • Dec 2017
    • 3255

    #2
    maybe something here about extending cartridge forks;

    "Installed everything finally. Ran into a couple snags. 2016 Sportster XL883N models have a cartridge damper (kind of like a sport bike set up) on the left fork, whereas the right fork has the traditional damper tube. After looking through older Sportster model manuals, I found that up to 2015 (I think) they used traditional damper on both sides. So, I purchased all the right side internals from HD and installed it on the left side..."

    This is crossposted from HDForum, so, there you go. DISCLAIMERS: 1) Buy/acquire a FSM. Everyone says this and it's a great thing to have. I have a pdf for 2004-2006 sportys if you want it. 2) If norcal style chop isn't your thing, move on. I know it's gonna handle weird. #MakeEmWorse. The planets finally aligned and
    If buildin' old school choppers was easy, anyone could do it... ain't nobody said it's gonna be easy...

    Comment

    • chopnscoot
      Junior Member
      • Jul 2019
      • 3

      #3
      Originally posted by TriNortchopz
      maybe something here about extending cartridge forks;

      "Installed everything finally. Ran into a couple snags. 2016 Sportster XL883N models have a cartridge damper (kind of like a sport bike set up) on the left fork, whereas the right fork has the traditional damper tube. After looking through older Sportster model manuals, I found that up to 2015 (I think) they used traditional damper on both sides. So, I purchased all the right side internals from HD and installed it on the left side..."

      http://www.chopcult.com/forum/showthread.php?t=51109
      Thanks for the help, I appreciate it. After a lot more searching I also found this thread: http://www.chopcult.com/forum/showth...t=46755&page=2 so maybe my post is a little redundant, sorry about that.

      Comment

      • andrewc
        Senior Member
        • Apr 2011
        • 255

        #4
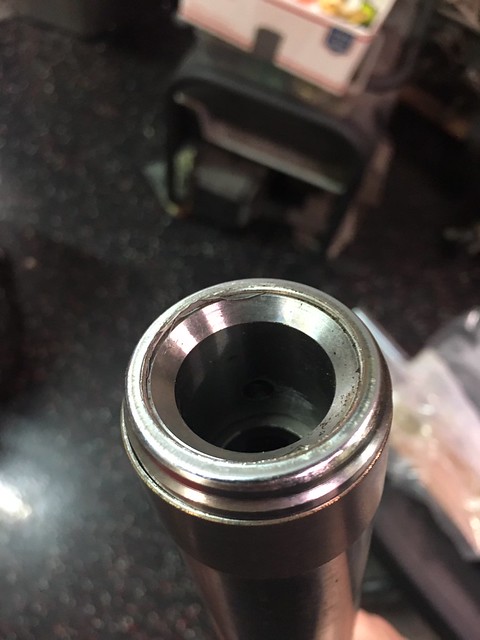
        extending the 1200s (sportster sport) and fxdx 39mm forks can be done. depending on how much longer your new desired fork tubes are, is how much you will extend the "damper" rod. (not sure if that's the correct term/name for a cartridge style fork rod) when I recently did mine, I bought the new standard 39mm tubes, measured them, then measured my original tubes, and subtracted the difference. its best to do it this way as a lot of the "exact" measurements floating around the Internet are not always correct for your year and model, and different manufactures of fork tubes list different measurements for the popular sizes/lengths. (2 over, 4 over, 6 over, etc.) there is a raised "cup" casted into the bottom of the adjustable 1200s slider that the traditional 39mm Showa sliders do not have. I wasn't sure if these "cups" in the 1200s sliders would interfere with the new fork tubes damper rod guide that all the standard 39mm forks come with. my stock 1200s fork tubes did not have these, so we ground the lip off the rolled over damper rod guide piece and pressed them out. this can also be done on a lathe, but from what I was told and have seen, most non-industrial collets and lathe clamps only have a 35mm bore. this way worked good and was very easy to do. here's a picture of a stock standard fork tube with the damper rod guide/bushing.
        IMG_5674
        here is the same fork tube after having the rolled/folded edge of the damper rod guide/busing ground away.
        IMG_5679
        .
        IMG_5672
        and here's the same fork tube with the complete damper rod guide/bushing removed.
        IMG_5675

        again, I'm not 100% sure that removing the stock damper rod guide/bushing is necessary as I didn't test a stock fork tube in the slider and since the original tubes did not have them, I went ahead and removed them. next you need to extend the cartridge rod. you can either find a similar walled, same od piece of pipe/tubing and simply cut the rod somewhere in the area that isn't in the stroke range (won't pass below the bottom bushing) and weld the new piece in and now your damper cartridge rod is lengthen to your desired amount. if you choose this route, tig welding this would be best, or a decent dressing/smoothing of the welds is needed as the id of the spring is pretty close to the od of the damper cartridge rod. (not much room inside the spring for the damper cartridge rod) I chose the second method of lengthening, just make a threaded adapter. the pieces my buddy made me are tapped for the 10x1.00 fine threads that the original damping cartridge rod and preload adjuster "fork caps" use. the other end has male 10x1.00 threads cut into it as well. the only reason it is hexagonal is because he had some hex stock that was the perfect size laying around. like before, measure the differences between your original and new fork tubes, and that will determine how long your new "spacer" pieces will be. my buddy made them on his lathe, as there still needs to be a hole of the same diameter drilled through the length of your spacer so fork oil can travel though just as the stock rod has.
        IMG_5732
        and finally, the pvc spacer is just there to take up the difference in length for the spring since it stays the same length and in its original orientation/location in the fork. here's how it looks as an assembled unit.
        IMG_5735
        hope this helps someone in the future wanting to extend their adjustable Showa 39mm forks.
        IMG_5807
        Last edited by andrewc; 08-08-2021, 4:49 PM.

        Comment

        • chopnscoot
          Junior Member
          • Jul 2019
          • 3

          #5
          Wow that is super helpful. Awesome tutorial that seems easy to follow, thanks for taking the time to write that up. However, I found a decent priced traditional dual disc front end that I’m going to extend so I’ll probably end up selling my adjustable forks as they are. Your bike is killer, I’m going for a pretty similar style with mine only longer in the front. What seat is that?

          Comment

          300 mobile ad bottom forum

          Collapse
          Working...
          ;