Sportster chopper build/ college welding project

Collapse

Desktop Ad Forum Top

Collapse

Mobile ad top forum

Collapse
X
 
  • Time
  • Show
Clear All
new posts
  • Jake883
    Member
    • Mar 2019
    • 48

    Sportster chopper build/ college welding project

    Hi. My names jacob. I'm in my senior year of welding school and ride a 1992 sportster. It's a hugger w 11.5 shocks and 6 overs I put on last summer. Over the winter and for my classes welding project, I will be chopping my sportster and hopefully boring it out.

    Due to the way the battery mounted to the oil tank on the 92, the oil tank had cracked and the battery was loose and leaking. Upon stripping it down it was way worse then I thought and the battery was pretty much mainly being held on by the bottom bracket. It's a good thing I'm replacing the oil tank with the hardtail.

    I had picked up a tc bros hardtail and oil tank for pretty cheap off craigslist. Currently the bike is mostly stripped down. I'll be posting pictures of the build as I go however it's at my garage at home and I go away for school and I'll only be able to work on it when I'm back home.
  • Jake883
    Member
    • Mar 2019
    • 48

    #2
    Click image for larger version

Name:	20200115_174747.jpg
Views:	1
Size:	305.4 KB
ID:	1315126

    Comment

    • Jake883
      Member
      • Mar 2019
      • 48

      #3
      Click image for larger version

Name:	20200111_124325.jpg
Views:	1
Size:	305.3 KB
ID:	1315127
      Last picture before strip down.
      I could probably pull the motor now since all the electronics are disconnected from it. The harness is still held in by the headlight and taillight and the hand controls. The electrical part is gonna hold me up bc I'm not the best with that but I dont think the welding and fabrication part will be too hard for me.
      I plan on welding new pipes and bars and possibly a new tank. Also, it is leaking from most of the engine gaskets now so I think it's time for a rebuild. Hopefully im gonna put in a hammer performance 1250 over my march spring break. And finish most the welding if I get my tig welder setup by then. I'm hoping my old boces teacher will let me use one of their welders to weld the hardtail if I can finish stripping the bike before I go back to school. That way I could leave it as a roller while I'm at school and leave the engine on a stand and rebuild it the week im back in march. Idk if im starting to ramble but I have very little time to get alot done. Gonna worry about paint later but it's my only vehicle and want to ride it by spring if possible.

      Comment

      • rockman96
        Senior Member
        • May 2018
        • 895

        #4
        When you start cutting and welding on a frame, make sure you have good reference points and measurements. Measure three times, and cut once. Use straight edges and string. Be careful and keep an eye on things during weld-up, things will draw on you if you're not careful.

        Just because you are leaking oil doesn't necessarily mean you need a rebuild, there's more to it than that. Nothing wrong with pulling it down to add cubes, but don't shortcut or go cheap... do it right (which may mean paying someone else to do parts of it.) I don't know what resources you have available.

        Have fun, good luck, and keep us posted. I like seeing younger guys taking things on like this.

        Comment

        • golfish
          Senior Member
          • Jul 2017
          • 156

          #5
          Good for you young man. Like mentioned, double and triple check everything..

          IMO, The evo carb sportster are the best of the bunch. Good luck and don't be shy about asking for help. There are some really talented guys on this forum..

          Comment

          • Jake883
            Member
            • Mar 2019
            • 48

            #6
            Thanks for the input, I planned on using tape and straight edge and getting a good prep before welding. Only thing holding me up all the damn wiring connecting the headlight and bar controls and the wiring for the tail light. Might just take the bars, speedo and headlight off and then undo the back fender and just take it all off together and leave the wiring harness attached for now. Itll all be held together by wiri ng but at least I could get it out of the way so I could pull the motor. And by rebuild the engine I mainly meant redo the gaskets and seals in the top end. Also leaking oil around aircleaner, thinking umbrella valves...

            Comment

            • BrokeAss
              Member
              • Jan 2020
              • 39

              #7
              Wish I'd started at your age, I'm a bit jealous! I was busy with an "unplanned" family while attending college so...too busy for such pursuits!

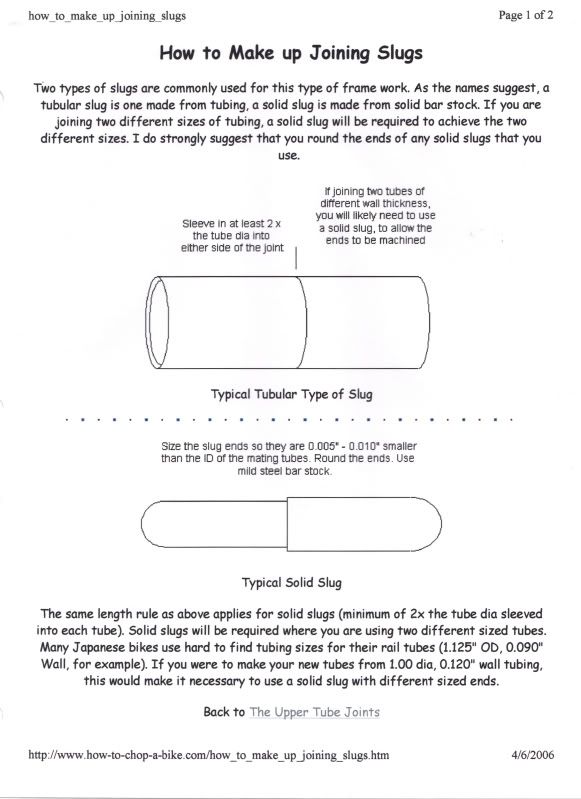
              Buying a used hardtail setup, I'm curious if you got any instructions with it. In case not, be sure to sleeve your joints and leave adequate gap between the tubes so your bead gets adequate purchase, and do rosette welds into the sleeves on either side of the joint.

              Comment

              • farmall
                Senior Member
                • Apr 2013
                • 9983

                #8
                While drilling round holes for plug welds became customary, slitting the tubes near your joint with a cutting disc instead permits easy slug alignment (stick pick or flat screwdriver in slit), observation of slug position, and of course leaves more welding surface. I first saw it on Chop Cult but forget who posted it.

                If you don't already own one, 6" grinders are rightly popular with weldors. My pipe weldor instructors lived by them and only broke out the 9" grinders for heavy work. They didn't buy 4-1-2" grinders because the 6" will run 4-1/2" accessories too and also fit the far superior (greater edge speed, reach and longer life) 6" cutting discs. I buy those by the box as they make quick, accurate cuts in pipe or plate.

                A digital level or inclinometer is very nice to have.

                If you're not familiar with the Weldingweb and Miller forums, go there and read yer ass off. They're an outstanding way to learn about equipment and how to get deals on used industrial welding gear. I only buy US made torches, all used, and older is usually better though Smith maintained their quality and are US made. (I'm not a brand ho and actually prefer old Oxweld/Purox torches but they're all pretty close). Avoid Airco/Concoa as parts are a bitch and there's nothing special about them. Working in the field you'll want Victor because that's what everyone else uses,you can always get parts and their variety is enormous. Your local welding supply or online rebuilders can do your oxygen regs (not worth it for me to clean most of the time) and anything else ya want done.

                I rebuild my own torches, flow meters and regs per factory tech data and do some welder and feeder repair, the info saved me a lot of money and I'm better equipped than some of my professional weldor bros. You can learn how to buy used cylinders for exchange (do not lease, you will own nothing and low hobby gas use rate makes it a money loser. The right mix of new and used gear can make your money go a very long way. There are many better weldors than I but many great weldors aren't equipment geeks. You can download manuals from makers sites when shopping for used machines and know more about them than some sellers. I always buy quality. Pay once, cry once. BTW even my Miller 340 runs decently off a 50A outlet though not maxed out and my MigMaster 250 did fine off a 30A dryer outlet for years. I assembled a 100-foot cord and between that and strategically located outlets have plenty of reach. You can never have too many cords or too much welding cable. QDs make it easy to use as much as you need and they're cheap.

                https://weldingweb.com/ Their for sale forum is worth a look too.

                Canonical Tozzi TIG rig build thread with example parts list: https://weldingweb.com/showthread.ph...ht=tozzi%20tig


                Find replacement parts and receive detailed answers to your questions by downloading owner's manuals for your Miller products.


                I don't know if your instructors do this but some don't. Mine taped over amp indicators on the Dialarcs we used to train on stick and TIG then changed the settings every night to force students to set them by welding on scrap instead of setting memory. (Not every machine behaves the same on the same setting either!) This helps pass hiring tests where you'll often be given a worn out eight-pack or other shitbox to see if you can handle it. This also prepares you for working several floors up with your power source on the ground because telling your helper to "bump it" is what you'll have for amp control and the long cables require compensation.

                Study way more than your school requires then go make money!
                Last edited by farmall; 01-17-2020, 2:10 PM.

                Comment

                • Jake883
                  Member
                  • Mar 2019
                  • 48

                  #9
                  Originally posted by BrokeAss
                  Wish I'd started at your age, I'm a bit jealous! I was busy with an "unplanned" family while attending college so...too busy for such pursuits!

                  Buying a used hardtail setup, I'm curious if you got any instructions with it. In case not, be sure to sleeve your joints and leave adequate gap between the tubes so your bead gets adequate purchase, and do rosette welds into the sleeves on either side of the joint.
                  Yeah I actually got all the original instructions from tc bros and all the hardware packaged up from the guy who had bought it, he ended up getting rid of his project bike so I got the Tc bros hardtail and oil tank for 325 which is less than the hardtail alone on their website.

                  And thanks for the links farmall I'll read into them. I've watched countless videos of installs and read through the instructions real well. It's funny you mention your teacher taped it off and changed it my teacher will have us change booths and machines and wont let us get used to settings as well. Both my boces teacher on long island and my college teacher especially last semester have been really great in getting me a good education. I have an everlast tig and stick welder, its a 210 with an adapter to run it to a wall outlet. I'm pretty sure everlast is china made but I've heard alot of good reviews about them and my teachers also have recommended them as a good bang for your buck. I ran alittle stick however I haven't gotten a torch regulator and pedal or gas yet to try the tig. I plan on getting that stuff when I am back full time from school. I'm hoping to trailer the bike upstate to my college so I could use the Lincolns we got in the shop. Interesting about making the rosette welds more like slot welds but makes sense. I'll keep posted however it might be a little bit until I could get my bike upstate. As long as it's rideable by spring I'll be happy.

                  Comment

                  • TriNortchopz
                    Senior Member
                    • Dec 2017
                    • 3258

                    #10
                    While drilling round holes for plug welds became customary, slitting the tubes near your joint with a cutting disc instead permits easy slug alignment (stick pick or flat screwdriver in slit), observation of slug position, and of course leaves more welding surface. I first saw it on Chop Cult but forget who posted it.
                    I shared that info from a post on Chopper Compendium; it had some good pics with info that are now kinda obliterated thanks to the latest round of bs from photofuckit, but it has 4 good short videos, where he uses the rosettes (5/16") at 5/8" from end of tube, and 5/8" from the end of slug (slug is inside the tube 2x the diameter of the slug).
                    It is in the comments below the videos where one of the guys says he slots the frame tube from the end to the rosette hole:

                    "...I 45 the joint, but I use slots on the frame tube for two reasons.... It make the frame tube "give a little" to get the slugs in and it gives you more weld area on the slug. I drill four holes and then mark the side of the hole to the end of open tube, cutting with a cut off blade. Drilling the hole doesn't leave a sharp end that might split from flexing. the same way you stop a split in flatbar or sheet metal. Haven't had a frame break in 45 years, but what do I know , I have no formal schoolin ! ... ; )"
                    and he clarifies:
                    "...I drill the holes and cut slits to the hole that makes 4 slots with no stress risers . Tube is then beveled and welded to the joint, then welded all the way around, after tacks are made at the slots to stop pulling .... might not have been clear ... been a while since this post ... ; ))"

                    see more here:

                    slugging a frame

                    If buildin' old school choppers was easy, anyone could do it... ain't nobody said it's gonna be easy...

                    Comment

                    • Jake883
                      Member
                      • Mar 2019
                      • 48

                      #11
                      Thanks for the link. Those videos look like they'll help

                      Comment

                      • tzienlee
                        • Apr 2024

                        #12
                        good to see a young lad getting stuck in to building a bike and knowing his own limitations, good for you lad,
                        if you need any help or advice, there will be loads here, some useful, some not so useful or off on a tangent, so make the questions so clear that no one can get the wrong end of the stick,
                        being new to it all, the three things I would advise is,...

                        1) do one thing at a time, don't get so far ahead of yourself you get dazed and confused as to where you are with it all, do things in a modular fashion.

                        2) buy tools, lots of tools, even if you think you don't need them, you will, I have over $15k of hand tools alone and still there are things I could do with,.. and then, buy more tools.

                        3) get books and manuals, knowledge is the thing you need and they are where you will find it, after 45 years of ripping bikes apart and building, every now and then I get the books out, they should be the best friend you have after ya dog,....

                        we like pictures here, lots of pictures, close up & far away, colour or black n white it doesn't matter, we all have Crayons so can colour the black n white ones in ourselves, and finally, welcome to Chop Cult Jacob, good to have you here...

                        Comment

                        • BrokeAss
                          Member
                          • Jan 2020
                          • 39

                          #13
                          Originally posted by Jake883
                          Yeah I actually got all the original instructions from tc bros and all the hardware packaged up from the guy who had bought it
                          Awesome! Hope my comment wasn't insulting, you sound like you know what you're doing, it's just that a good friend of mine recently bought a raked hardtail Ironhead and after he took the tank off the other day to do some mods he noticed some wonky joints in the frame where the neck was cut off and raked. Turns out there are no sleeves/slugs in the frame whatsoever, the hardtail and the raked neck were both done by simply butt welding the tubes together...it's a death trap waiting for an unsuspecting victim...he's now contemplating how to salvage the frame...personally I advised him to bail on it and find a fresh one...

                          Comment

                          • Tattooo
                            Senior Member
                            • Sep 2012
                            • 12407

                            #14
                            Originally posted by BrokeAss
                            personally I advised him to bail on it and find a fresh one...
                            Just remember the title goes with the frame................ Unless he has an early motor that is............

                            Comment

                            • confab
                              Senior Member
                              • May 2019
                              • 1337

                              #15
                              Is there a general consensus about the best type of steel to make a slug from?

                              It needs to be imminently weldable, hard enough it doesn't bend.. But soft enough it isn't prone to cracking and is easily machinable.

                              ???

                              Comment

                              300 mobile ad bottom forum

                              Collapse
                              Working...
                              ;