
 Tweet
Tweet
Kudos for checking yourself. I've had a bobber project apart for going on 3yrs now (proverbial builder too busy to work on his own...). I brought it home so I no longer associated it with the shop and began reassembly here, since then it's picked up steam and I'm excited to get it finished and get back on it. However, the devil is in the details, so I've had to get out of the TV reality build show mentality and remind myself there's no ridiculous deadline to meet, what's important is not being disappointed later that you skipped over some important attention to detail.
-
-
Thanks BrokeAss , yeah it’s surprising how difficult / demoralising the build can become , when either life puts stuff in the way of us building or being able to the see the build properly . Or even worse , we put the restrictions there ourselves and get in our own way !
But it is cool when we clear the debris and get it in into sight again , it seems to be so easy to plan / progress and the excitement returns .
Good luck with the buildComment
-
Have done a rough mock up to make sure it will look ok ,and 4” seems to be plenty for the rear end stretch the seat and the silencer are rough estimates , will sort them when I’ve stretched it . I’m Guessing 4” will be adequate for the goose neck also !
Comment
-
Streuth this going painfully slow , but have managed to fab a jig to stretch the rear end ( I decided on 5” in the end ) and lower it 1.5” to match the front end , when I get around to doing that . Checked the s/ arm and it’s solid with no movement at all , so have used that as one of the pick up points . Will then cut the rear half of the s/arm , join the axle plates to the frame , then remove the rest of the swarm afterwards . Well it’s a plan anyway !
Oh yeah before anyone says any thing, I cut all the jig bits . Intending to tack them in place with the arc welder the but the arc welder seems to have died , so they are all just propped in place , . Guess I Will have to unpack the mig when I get a chance ,Comment
-
Sorry bout the upside down picComment
-
Managed to grab a couple of hours on the bike today , and went past the point of no return . Settled on 4” back and 1 1/2 inches up for the rear wheel . Needs a bit of measuring and checking , then I can start to to dothe replacement tubing
Comment
-
There it is...chopped.
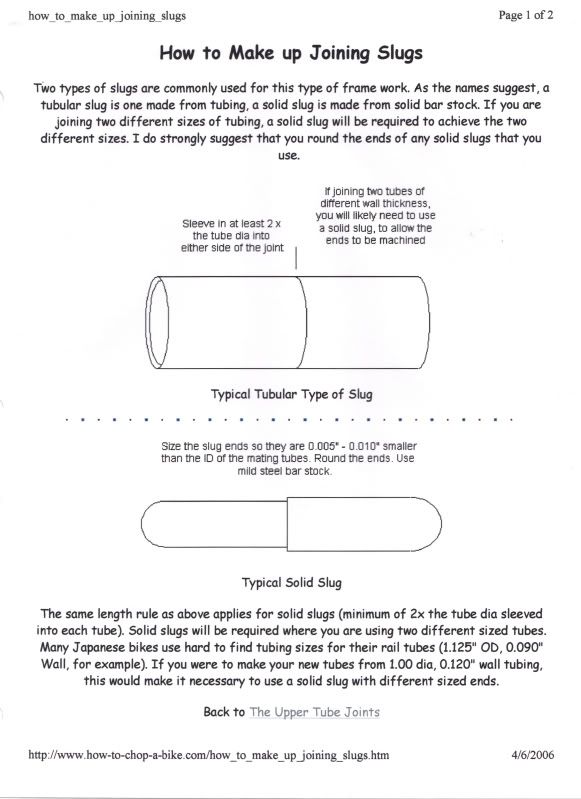
Just curious; is there enough material at the axle plate to run a slug to connect the tubing?
Slugging a frame:
Also, I can see the swingarm is narrower than the frame...are you gonna add the new tubing to the frame, or to what was once the (narrower) swingarm and cut out that upright curved piece?
Will you need to widen the axle plates?
Sorry if you explained this already and I missed it.If buildin' old school choppers was easy, anyone could do it... ain't nobody said it's gonna be easy...Comment
-
Interesting questions there , did have an idea . But I think looking at it chopped it ain’t gonna work , and no you didn’t miss any thing re your ?s
At the moment my plans are as you say. “ there is chopped ‘ lol . The main idea is to come from the frame to join up to the plates . Think the simplest way is to widen the axle plates and use a longer spindle and spacers .
The ends of the axle plates are recessed to allow a slug to be insert to connect to the tube , which is how it was done at the factory as far as I can see !
The bottom tubes look easy if I use the widened plates route . The seat rail tubes I would have to heat and bend up a bit ( not a major prob ) to get he angles right .
The only other option I feel happy with is to use fabbed plates wider again . With frame tubes running either side of the axle , and the plates in between .
That’s about where I am at the mo .
Thanks for the grey matter promoters lolComment
-
Ok after sleeping on it , have decided to go with the the wider spaced replacement axle plates . With the frame tubes going past the r/ w spindle and a 10 mm axle plates in between , a longer axle and a spacer either side of the wheel .
Seems to be the best option to meComment
-
how much difference between width of stock axle plates and the rear frame rails...top and bottom different widths?
Can see there was an offset in the left lower tube of the swingarm...was that for shaft clearance?If buildin' old school choppers was easy, anyone could do it... ain't nobody said it's gonna be easy...Comment
-
Width difference is the size of the frame tube 1.25” plus about 3-4 mill clearance . Twas the same top and bottom and side to side .
Just enough to allow the s/arm to fit and work . The shaft ran between the the upper and lower rails so didn’t seem to affect it directlyComment
-
Hmm, sorry thought I’d deleted that reply , there is a difference from side to side the shaft side will nearly ? ( can’t tell yet, need more time on it ) line up with a axle plate bolted to the wheel , wnen from the frame tubes . The other side needs at a rough guess A 20 - 25 mil spacer on the axle
Will have to have a good measure up when I can get some time out there again .
The bottom rails are cool height wise , but the top ones will need lifting so theyre appx 1-2” higher where they end at the mo .
Have got two ( plus ordered another two ) seat rail conversion tubes from cycle haven , with I believe have a 15 degree bend in them
Which when lined up ( appx at the mo ) seem to replicate the angles on the original axle plates and have enough length to be able to slide them forward or aft if needed . To miss the diff .
Think that covers it at the moComment
-
After much frustration and time last week trying to make sure the axle was square with the frame . I Eventually realised that if I turned the spirit level round it gave me a different reading , lol ! So armed with a new spirit level I spent an hour out there to day and it’s all square now .
Also realised that if I chop the frame mounting lugs of the original axle plates , and tidy them up a bit . With a little tweaking they could be welded between the proposed frame tubes saving me money , time and prob making a lot smarter result than I could fab up . .Comment
-
Managed to grab another 2 hours on it . It Went quite well ! but had to cut and fold the frame rails at the friend so will have to gusset them the up internally and externally later. It’s all only tacked (arc) till I get it all sorted . Then will slug / gusset it and mig weld it all up . Shortened the slot for the rear wheel and will make a plug and weld it in there. Have cut the rear square at the mo ,but will round the tube ends off , looking from the side . And obviously put some cross members in between the frame tubes , when I can decide where they need to go plus loose the std ugly seat rail . The axle plate the other side reaches forward another 3” so will get some 10mm by 2” bar to extend and match up this side top and bottom and give it bit grip on the frame tubes . think that’s about it for now !
Last edited by dowood1; 03-14-2020, 7:49 AM.Comment
-
Have straightend the top rail out where it sagged a bit ! Put in the upright tube and shaped the rear end of the tubes . Wasn’t sure at first , but it’s having done that it’s working for me now . Still all just tacked in place . I know it’s not to everyone’s taste but I’m happy with it . I know there’s a shaft drive to run thru that space , but I think that’s gonna hold a fair sized fuel tank in there , possibly the batt as well !
Comment

Comment