
 Tweet
Tweet
Hey guys so I was tinkering around the other day and found a crack on one of my frame rails. At first I thought it was just the paint, but I chipped some off and it was through the primer too. The crack doesn’t go fully around the diameter of the tube, and the other frame rail is crackless and the backbone tube is also Crackless. Can I ride on this for a little while/can I fix it by pulling the motor and laying a bead over the crack? Or does this require more? Any advice is appreciated, pics of crack below.


-
-
WOW, that's not going to buff out.
I would think that riding would, could cause stress in other areas -
I'd grind the crack, weld it, polish the weld flush with adjacent tubing then reinforce the joint with a welded split sleeve repair. It's on the bottom of the frame so the cosmetic alteration won't be visible. The aviation world knows its shit when repairing tubular frame structures.

I wouldn't ride it until it's fixed to avoid overloading something else and being unpleasantly surprised.Comment
-
Were the frame rails stretched or at a location of a joint for a weld-on hardtail? Thinking if they were cut, slug fitted and welded,maybe it didn't get welded at that spot - a Monday morning or Friday afternoon job...perhaps done on April 20th - you know, 0420!Last edited by TriNortchopz; 04-20-2019, 6:42 PM.If buildin' old school choppers was easy, anyone could do it... ain't nobody said it's gonna be easy...Comment
-
Thanks for the help guys, unfortunately got some new bad news, just pulled the motor out tonight and theres a hairline crack on the backbone under the gas tank.
Comment
-
I was gonna ask who welded the hardtail on, then remembered you did...
"So I went with the Haifley bros hardtail, but I actually didn't end up receiving it until a week after my winter break ended. So fast forward a month or so."
"Me measuring the cuts I need to make"
"So I lined up the hardtail with the motor and tacked it into place with my crappy flux core welder"
"then I went down to my dads shop and did the rest with the gas MIG welder they had down there"
Thread: First chopper build
How did you do the joining of the hardtail to the original section of frame?
I think I can see the join in the backbone after your gas MIG weld. Maybe you ground the groove weld off - kinda looks like a dip in the frame right at the joint...
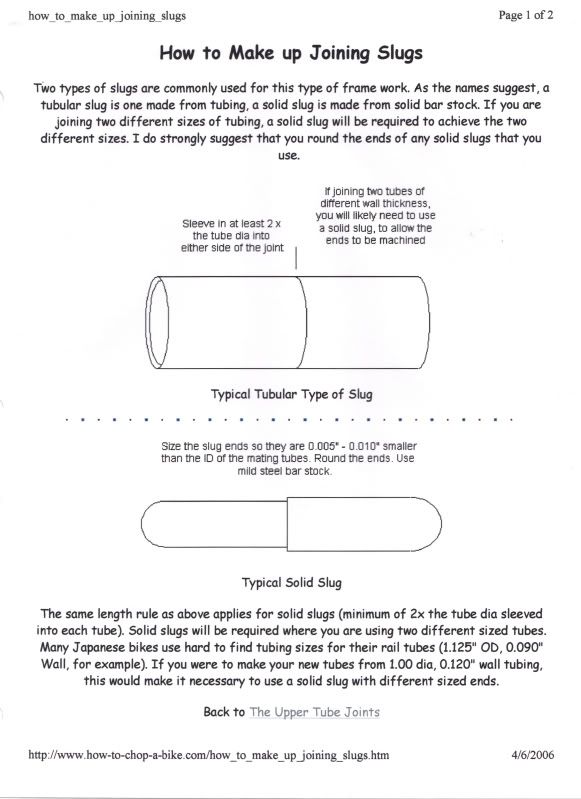
Should have been done with the groove weld and plugs welds to hold the slugs, and ends of slugs rounded, like this:
Slugging a frame; How to make joining slugs
If buildin' old school choppers was easy, anyone could do it... ain't nobody said it's gonna be easy...Comment
-
Update: when this hardtail was welded on, it had reinforcement sleeves inside each tube at the weld location, well as 3 plug hole welds for each frame rail + 3 for the backbone. Would it still be too sketchy to just weld a bead over the cracks and primer them?Comment
-
Yes, Unfortunately for me I’m realizing it might have been foolish to teach myself how to weld on my hardtail install. The hardtail had solid slugs in the each of the tubes, and I drilled 3 holes in each tube of the original frame to plug when I put the hardtail in. After those were plugged, I welded the seam between the hardtail and the original frame. I probably grinded down too much material and my welds were not seamless. If only I could go back and do it again now. :/Comment
-
In farmall's post, he linked the aviation welding site, which refers to the length of the inner sleeve: "...length that the ends of the inner sleeve is a minimum distance of 1½ times the tube diameter from the (end) of the cut"
Was your sleeve this long?
It also mentions a 1/8" gap between frame sections, "Weld the inner sleeve to the tube stubs through the 1⁄8-inch gap forming a weld bead over the gap and joining with the new replacement section."
I would cut a groove (1/8") through all three of the hardtail/frame joints, which shows up as a crack, to the depth of the inner sleeve, then weld it all around. Maybe get a certified welder this time.If buildin' old school choppers was easy, anyone could do it... ain't nobody said it's gonna be easy...Comment
-
Welding requires many hours of systematic practice, so don't give up but do study the fuck out of how to do it right and don't try to invent any other way than proven methods. Practice each joint you wish to learn on clean material, never your workpiece, then cut through the weld to inspect or cut coupons and destructively bend test them. Weldingweb and the Miller forums (and free online training videos) are your friends. Steel is cheap new and it's hard to get consistent small tubing scrap.Unfortunately for me I’m realizing it might have been foolish to teach myself how to weld on my hardtail install.
Now you need to get it done, so I'd strip the remaining parts off frame, take it to a sand blaster (I use monument companies since they all blast on the side when not cutting tombstones), then correctly grind out and reweld with a proper MIG. Those little FCAW machines are for very light work. I have one but it doesn't get used much.If only I could go back and do it again now. :/
Since everything is lined up the actual prep and welding won't take long. You have the engine out so removing everything else is easy. Then you won't have to pull the engine in future for paint or coating and you can position the frame comfortably for each weld instead of wrasslin' a rolling chassis. I'd grind out all your original beads and reweld. Either have a real weldor show you how then watch as you do a test piece then supervise your welds, or have them make the welds while you watch.Comment
-
-
The inner sleeves came already in the hard tail when I bought it from haifley, so I can only assume that they are correct size (I think the guys at haifley are pretty reputable). I didn't measure the length of the sleeves before I welded it in, so I also can't be completely sure.Comment
-
Thanks for the help Farmall, I don't have the funds to repaint the frame if I get the whole thing sandblasted, but as of right now I think my course of action is going to be:
1. Strip remaining components off of the frame to make welding the seams easier
2. I have the sprung section of my frame still, so I'm going to measure the wall thickness on each of the respective tubes, and that value will give me my depth of cut for each groove I'm going to make on each weld seam. This depth should bring me down to the solid sleeve that is currently in each of the frame tubes. a few people have also said the width to make each groove is 1/8". So as of now I will use this dimensions as my basis.
3. I'm going to check out a few of those welding vids, hopefully pick up some more tips on basic welding and how to attack my situation. As well as contact a few of my friends who are better at welding than me to give me some advice. maybe practice a little while I'm at it.
4. Since I don't have the money to repaint the whole frame, I'm going to grind the paint off only at the seams where I'm going to cut/weld and, and while I'm seeking out help to do this I still plan on doing these welds myself. I'm not going to grinds these welds down at all, and after they're done I'm going to primer over them/ seal them appropriately etc.
This thing is probably going to sit without heart for the week or so, when I have the chance to do the frame repairs I'll post more pictures to update. Thanks for the help!Comment


Comment