
 Tweet
Tweet
I have a cal inner on mine. just lucked into it with my indy. very happy with it.
-
-
Hoping this cures the problem .... If so, I'll also be happy as a pig in shit....
Take my 45 and outrun em all ..Comment
-
They weren't playing when they chose that wall thickness.Comment
-
King Tiger Tank .....
Good Golly ....
Here we go ...
Was in the mode of installing the inner .. Seen that two of the four bolts was left out on the motor, went to loosen up the five nuts on the tranny to frame mount and one was loose as a goose ...
Got the inner on and was going back to tight on all, and the one that was loose on the tranny kelp spinning .....
Ok ... Time to see if the owner wants me to fix these latest problems that stuck their ugly heads up... ???
Just called the owner, Got the Ok for doing thread inserts on the motor case and will need to pull the tranny in order to install a oversize stud in order to repair that one ...
Going to wait till the tranny is out, just may be the threads on the nut has given up the ghost...??
___________________________________________
Got a light under it to get a good look at what was going on with that stud ....
___________________________________________
It was the threads in the nut that was striped out ...
Ran a thread chaser on the stud and looks like the threads are still usable ...
(Thanks goes to the Harley Gods for dat, really wasn't looking forward to replacing a trans mounting stud due to the work involved in doing so)
Tranny was nailed to the plate with flat & lock washers... With the studs being somewhat short, not much thread contact was left for the nuts to do their job..
Got a new plan of attack for them... Going to use nuts with a bitter flange ...
That way no need for the flats & lock washers allowing for all the threads to be making full contact with the stud... Some red loctite will also be in play...
The reason for me to be messing with the trans mounting nuts in the first place was to let the tranny find a new home with the diff. inner primary that's being installed...
Got a new ballgame going on with the alignment..Last edited by Dragstews; 09-26-2018, 9:07 AM.Take my 45 and outrun em all ..Comment
-
Split lock washers suck anyway, hence their not being used by NASA and not commonly used in the aircraft industry. Star style are thinner and work better but safety wire or lock tabs or safety wire tab washers are far superior.
If you have or know someone with cobalt or carbide drill bits and a safety wire drill jig you could make sure they don't come off until required.
Last edited by farmall; 09-26-2018, 3:52 PM.Comment
-
What a superb idea ... ^^ ...
But, being I'm a Old Man, I'm not going to stand on my head safety wiring those nuts under the trans... "Forgetaboutit"
The bitter nuts will have to do the job ....
Ran up on another problem with the studs for tranny to primary mounting being to short for nylocks ...
So a trip to the hardware was needed...Last edited by Dragstews; 09-28-2018, 4:04 PM.Take my 45 and outrun em all ..Comment
-
Got it nailed down really well....
All fasteners has been reworked to the better...
The Tech Starter was so huge that a few places on the tranny had to be trimmed ....
Owner came in to take a look at the "King Tiger Tank Inner Primary" and said "It didn't come chromed ??"
I said, nope and it didn't come with a box of "Cracker Jacks" either... !!!
Said to have it plated ... Ok, just a bit of dressing in on some of the castings will go down before it gets shipped to the Bluegrass State...
Got a few nice add-on parts coming in for it...
One is a oil defector plate that keeps the oil out of the starter.... Just a bit better made than what Oem had going on....

And adding a baffle to keep oil out of the clutch... Primary will be sealed with oil like the Evo's ....
 Last edited by Dragstews; 09-28-2018, 4:06 PM.Take my 45 and outrun em all ..
Comment
-
Got just a bit more to do and it's off to the platers ....
Take my 45 and outrun em all ..Comment
-
Did you verify the starter engagement yet?
You know, before sending that inner primary off to Chrome...Comment
-
I did.....
Do think the inner was for the rear belt drive models..
I'll snap a few photos showing what I'm seeing a little later in the day...
Seeing the cutout for the belt drive pulley is the dead giveaway to ID-ing that it is indeed a belt drive inner primary ....
Also found a bit more MICKEY-MOUSE-ing going on in the clutch...
It has the Big Fix bearings with a tammer...
Good up-grades, but the Tammer is one of the plastic ones made for the three finger hub. This is running a five finger hub..
Problem with running the plastic Tammer on a five finger hub is only two of the stepped holes will line up, leaving one hole with no support for the snap ring....
Doing away with that Tammer and going to install this one in place of...
 Last edited by Dragstews; 11-18-2018, 6:47 AM.Take my 45 and outrun em all ..
Comment
-
I'm seeing why the builders did use the belt drive inner primary....
Ran up on a bit of a problem with the fitment ....
Well .... A trim job is in order ...
Tammer came in ....
Nice design ..
This will work with the five finger hub much better than what it had .....
Got it dial in and working on the inner primary, soon will have it done...
Last edited by Dragstews; 10-02-2018, 12:53 PM.Take my 45 and outrun em all ..Comment
-
Cool-Beans
Made the cut and did a test fit...
The cut was good to go having room for the swing of the nut....
But, the nut uses a allen bolt to lock the nut from backing off.... It was hitting .. !!
Instead of doing another set up on the mill table, I did a cut by hand...
All went well, wasn't much needed to see no contact ....
Now to box it up and send it off for some chrome....
___________________________________________
Also found the starter sol. arm loaded wrong ....

Took it all apart and assembled it back to the way the Mo-Co had it....
And another order went out for the spacer that goes between the sol. and primary..
What was there was a homemade spacer that was twice the thickness of Oem ....
My hat is off to the Boys who did the work on this scoot, really a fine job of rigging ...!!
___________________________________________
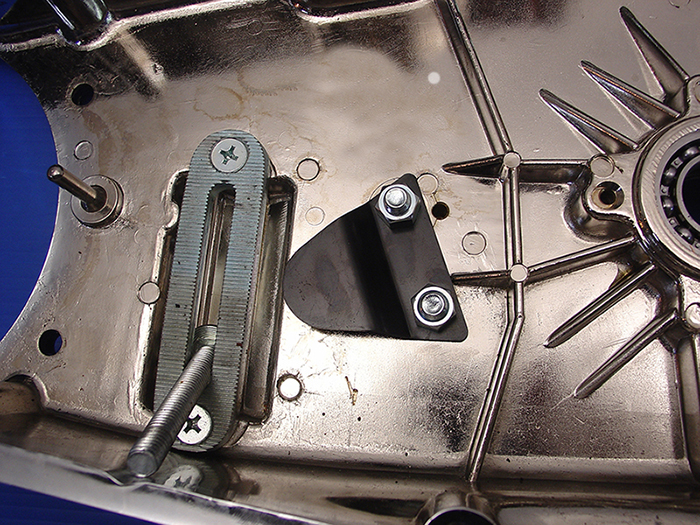
During the test fit, I also loaded up the oil baffle onto the two studs to see what all it was in need of...
Being the Cal-Products has a rib running down the middle of those studs, I was faced with a choice of removing the rib or making up spacers to bridge the rib...
I chose to make the spacers... Wanting to keep the beef, going on with that inner cover, intact ....
____________________________________________
And She's off to the platers ...
Attached FilesLast edited by Dragstews; 10-06-2018, 3:29 PM.Take my 45 and outrun em all ..Comment
-
-
Nice work mate.
What breed is that new fandangled tamer, looks the duckznutz.Comment
-
Thanks ....
The Tammer is made by Twin Power
Clutch Control Kit:
Control clutch jerking and get a smooth release on stud type clutches with this kit. This kit holds the clutch basket in proper position to eliminate clutch jerking or walking. It may be used on rear chain or belt-driven 4- or 5-speed models.
41-E84 Big Twin models
That gizmo and these bearings makes for ready nice up-grade for the Oem finger type clutch...

Belt Drives Ltd. Clutch Hub Big Fix Bearing Kit:
Solves many clutch problems, gives a firmer clutch basket and ends clutch slip. Replaces obsolete caged roller bearings.Last edited by Dragstews; 10-08-2018, 7:10 AM.Take my 45 and outrun em all ..Comment
-
Well now ....
Chrome laid down great on the Cal-Products Heavy-Duty inner primary ....
I can see myself .....
Dang ..... Didn't know I was that ugly .. !!
Ok .... Now to install all the parts in order to be able to put it on the bike...
I already did a trail fix with loosing up the tranny to let it find a new home with the Cal-Products inner... Also re-worked the studs and nuts to be a bit more Heavy-Duty..
That part of the install is over...
Being this will be running a sealed primary like the Evo's ... A bit of glue here & there will help from leaks....
I'm using a sealed bearing for the primary to main-shaft, but for a bit of over-kill also will be using another seal on the backside of the primary...
I have two to chose from ...
Went with the metal seal and install it in backwards cause in that area the room is slight...Last edited by Dragstews; 11-12-2018, 2:27 PM.Take my 45 and outrun em all ..Comment


Comment