
 Tweet
Tweet
a minor update: haven't been working on the bike that much. But I finally bought a vacuum bleeder and solved the front brake issue. Worked like a charm. Not sure why that worked and it didn't work when I was pumping the lever for an hour and a half, but I'm happy that I can cross it off the list. Hoping to start putting all the wiring back on soon. My goal is to have the bike done by the end of March, because i need to ride it asap. Feel free to nudge me to get er done!
-
-
 If buildin' old school choppers was easy, anyone could do it... ain't nobody said it's gonna be easy...
Comment
-
 If buildin' old school choppers was easy, anyone could do it... ain't nobody said it's gonna be easy...
Comment
-
Damn. Gonna be nice to ride my bike for the first time.
I'm going to be rebuilding the forks. I bought the seals, boots, etc. a while ago, and just haven't gotten to it yet. while I have them apart, I'm going to polish the legs a little more. It's not gonna be mirror finish at all, but probably very fine grit sandpaper. All I have to do is buy fork oil and I'll be good to go. One thing I've been debating, is if I should put fork gaiters on. I like them, but not sure if i wanna run them. Let me know what you think.
Here's a picture(not my bike) for reference as to how they would lookComment
-
another little update:
I went ahead and ground down some of the welds on the sissy bar the best I could. Even using the skinniest sanding bit with a dremel, It was tough to get into those tight corners/nooks. then I went ahead and gave it a little polish with the wire wheel. It's hard to see how it came out in the pictures, but I wanted a brushed/polished look. I can't afford chrome(also not even sure if I wanted to chrome this) so this is what I came up with. I'm debating putting a coat of matte or satin clear on it just so it doesn't rust. I plan on doing the same to the headlight mount. I just didn't want to paint everything black, and this is much better than raw metal.
Comment
-
Loved reading this, very inspiring dude. I'm building an XS too (my first build) and it's quite the learning curve!Comment
-
Thank you! I really appreciate that. I may not know much about building bikes, but I'm definitely learning as I go and it's super fun. I know all the hard work and late nights will pay off once I get to ride this. And if thats your xs frame in your profile picture, I'm really digging it. Would love to see more picturesComment
-
So tonight I tried to get started on those forks. I don't know why, but I expected not to run into any issues. Should've known better. A few things: On one of the forks, that top cap is stuck. I was going hard at it with an impact, but it won't even move. I even tried heating it up. I sprayed some PB blaster before I left the garage to see if that'll loosen it up when I get to it next. And on the other fork, it's the bottom bolt that won't come loose. There's a thread online from Hughs Handbuilt that I've been following to help me rebuild these, but it doesn't really say how to deal with these stubborn bolts. Any thoughts?
Top cap
Bottom allen boltComment
-
How big is your impact driver? Hope you had the bars off when you were on that top nut. Heat is good. Make sure your bit is of good quality, and a tight fit in the socket head. Whacking the top of the nut may help release the stuck threads.If buildin' old school choppers was easy, anyone could do it... ain't nobody said it's gonna be easy...Comment
-
Wow...this front end is kicking my ass left and right. I was able to take apart the forks with a lot of heat and a proper 17mm allen socket. All the bolts I welded to sockets kept snapping. I just put it in the vise and torched em up. But of course, those seals are being a pain to remove. I might have to borrow a seal puller from work to try to pry them out. I read up online and a guy recommended cutting a "finger" tab out of a piece of aluminum and bending it down to fit inside the leg so I'll have something to pry against. Hard to explain, but essentially you don't want to pry directly against the aluminum leg, otherwise you could nick it pretty good. Someone else also recommended boiling the seal in a pot of water to try to break it up. I'll have to try these out.
Also, I figured out why the stem wasn't sticking up all the way. As one of you suggested, the bottom race wasn't in all the way. I was mistaken for thinking it was. Hammering on it with a screwdriver wasn't doing anything but ruining the blades of my screwdrivers, so I found this pipe fitting that fits perfectly inside the neck, just the right outer diameter (1-7/8in) to press up against the race, and with some hammering, it fits good now. Not sure what the pipe fitting was originally for, but now it's my tool to seat lower races.
It really feels like at this point I'm taking 2 steps back and one step forward. By trying to replace worn parts(that worked okay for now) I just run into more issues that set me back. But, I have the lower tree bolted up for the last time, and once I paint the top tree tomorrow morning, that'll go on and stay on too. Hoping that by the end of the weekend I can have the front end done. I'm sure something will go wrong and prevent that from happening, but I'll definitely try my best. And really all thats left is to re-attatch the wiring(Which I've already started), and to rebuild the carbs. I gave them a good clean in the ultrasonic cleaner at the shop, but I bought rebuild kits and will have to re-jet for the new pipes. I've never rebuilt carbs, and I'd like to try it on my own while following the manual, youtube, or forums, but worse comes to worse, I can get one of guys at the shop to walk me through it.
I know this is a long update for almost nothing getting done, but we're almost there!Comment
-
A little update: it's all pretty much done. Carbs rebuilt, electrical back together, etc. Just waiting on paint, then it's time for the shakedown and minor adjustments. One little thing before that though. I'm having issues with the clutch sticking. I'll put it in gear and pull on the clutch lever and try to roll it around, but it won't come out of gear. I'm assuming that it's because it's been sitting for a little bit without being ridden. Is there anything that I might need to adjust or lube up? Maybe a new clutch cable?(rather not buy one if I don't need to). Trying to see what I can do without having to put in a new clutch.Comment
-
It's been sitting for a while - you started this thread in October 2017 when you first showed us the stock rat...did you even ride it before you started the chop?
Have you done anything to the clutch or clutch release mechanism (worm gear) as part of this build? Most likely the clutch plates are stuck together and check to make sure the clutch pull actually moves the worm gear. Is the clutch release properly set? Could try loosening off the locknut and screwing in the adjuster to confirm the pressure plate is moving. Greasing the worm gear would be a good idea. Wouldn't hurt to pull the clutch plates to clean and inspect them...then you'll know what ya got. Remember to keep them in order so the plates can go back in the same place.
and parts list:
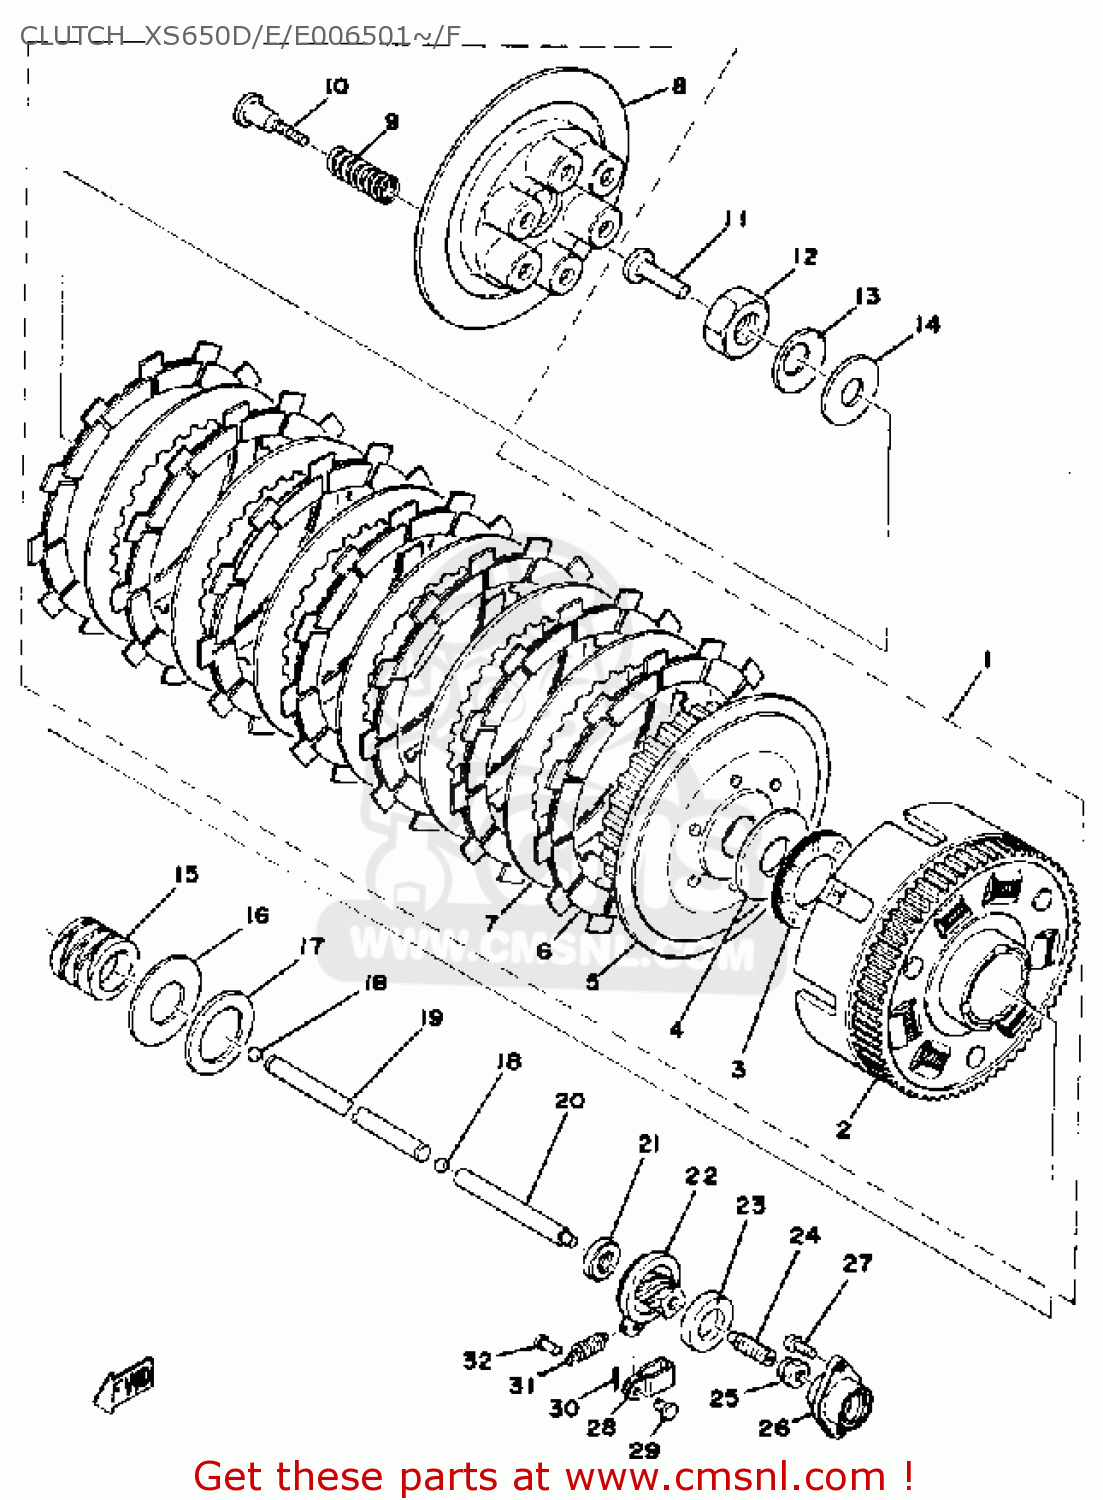
This seems to be common with ironheads, so here's a few techniques from 33'ers:
2018 Thread: 1971 sporster clutch / trans problem
"...it's been sitting for a long time and the clutch lever has good tension but doesn't seem to be releasing like the discs may be stuck or out of adjustment,..."
If buildin' old school choppers was easy, anyone could do it... ain't nobody said it's gonna be easy...Comment
-
Thanks! I'll definitely have to check that out. I rode the bike a little before starting this project, and the clutch seemed fine before. I was trying to just put it in gear and pull the clutch and roll it around to loosen it up. Started to a little bit, so it doesn't seem all that bad.Comment
-
Nice work man, keep at it.
I recently picked up a hardtailed 76 project I've been messing with.Comment
-
Just read through this whole thread and really has me wanting to hardtail my GZ250. They look SOOOOOO much better. Nice build.Comment


Comment