Zodiac: 1955 Swingarm Panhead Build

Collapse

Desktop Ad Forum Top

Collapse

Mobile ad top forum

Collapse
X
 
  • Time
  • Show
Clear All
new posts
  • ericthebeard
    Senior Member
    • Jul 2015
    • 119

    Zodiac: 1955 Swingarm Panhead Build

    Heya CC.

    I started this build thread on the "other" chopper cool guy forum and finally am getting around to copying it over here. So... here's a big dump of progress then it'll slow to a trickle as I am basically learning everything as I go.

    I'm new to CC, but have been lurking, searching, and reading throughout the years. Doing researching and ogling various build killer threads. And here I am starting off my own first project.

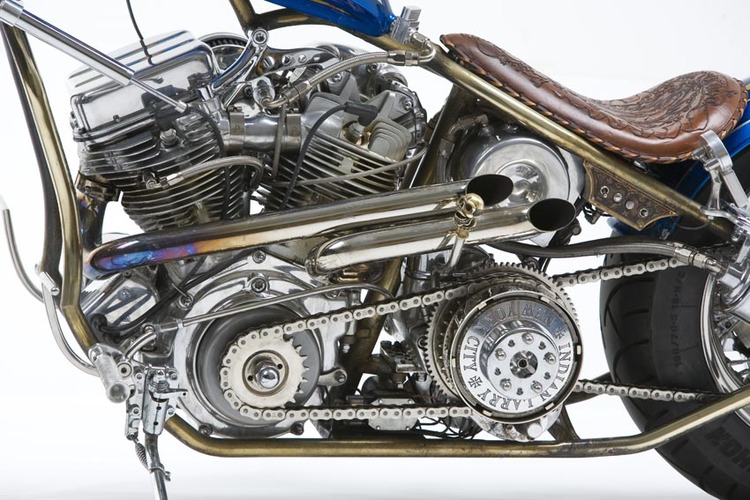
    Bike story: Found this awesome deal locally on Craigslist. The dude selling it listed a pretty vague ad for a '55 pan and basically said I'm not posting a price or any shit. Just come look at it and make an offer. So I did and I snagged it up. There's a pretty dope story to go with her, I'm the fourth owner. She used to be in full period resto form, but then the owner switched it up. Here's how she sits now (to my current understanding):

    Untitled


    Deets:
    -'55 Pan engine, full S&S internals rebuilt, Super E carb, S&S oil pump
    -Matching-numbers '55 trans, Baker internals
    -Shovelhead split tanks
    -Evo contorls
    -Newer (Evo?) front end, dual discs

    I love swingarm bikes. No plans to hardtail her.

    But I will say. I am new for sure and this progress will be slow going. Hopefully people here can assist with bumps and trials along the way.

    That's all the shit I can think is valid for now.
  • ericthebeard
    Senior Member
    • Jul 2015
    • 119

    #2
    She already started marking her space on the way home.

    My life forever now:


    Part of the bike's saga. Basics:
    Dude A steals the bike from Dude B, the first owner, in the 60's thereabouts. Dude B is apparently a legendary nut around the parts, files off the VIN and rides it like that for years. Later, after A and B made amends and A legally owns the bike, he gets pulled over and the cop sees the filed case. I guess back then you could get a "state assigned" VIN thats a replacement for the original. So there's a little official metal tag next to the old number area thats "55FLXXXX". She's titled as a 1955 HD FL with the same VIN.

    Bill, the owner I bought her from, picked the bike up from the local legend. He had lost his leg crashing the bike and had it mounted up over his fireplace like a stuffed Jackalope. From the 1996 Iron Horse feature on the bike, written from the guy I bought her from, "What my extensive research after getting the thing home revealed was that it was a heavily modified, patchwork, clusterfuck daily rider that had been in a mondo wreck."

    Bill did as close to a period correct restoration as his budget would allow, and that version of the bike was in the mag:

    Untitled

    He then got tired of the barely-stopping brakes and hardtail ride. Apparently at that time a dude rolled into the Monroe swap meet with a pristine '58 swingarm frame, so he bought it up and started the conversion to what it is now.

    Comment

    • ericthebeard
      Senior Member
      • Jul 2015
      • 119

      #3
      Its been a while, but things have been slowly moving along with the bike.

      Slow and steady.

      First off, Ive been making a black friday parts list for a few months now and pulled the trigger on some key bits while they were easier on the pocket book.

      First off is a Pangea Speed ARC clutch pedal. Andy was nice enough to set one aside for me before they go to chrome. I want the look of this ride to be more muted, at least for the metal finish. Very little chrome. I plan on parkerizing many of the parts, this pedal included:


      I'd also like to modify it al la Blackbetty's Killer Smile long bike and attach a little nubbin' for a heel perch when chutchin'.

      Next up I scored a BDL primary. Probably going to keep cooped up in the tins (well vented of course) but I'm happy to be able to close off the factory auto-leaker with this one:


      More mundane, got a trans plug for the speedo gear:


      And grips:


      Lowbrow also was having a half off sale on their aluminum fenders. I had assumed that I was going to do the typical steel fender, painted in kind with the tank, but after thinking about it it seemed pretty dope to go with a polished/brushed alloy fender offset with the rest of the paint scheme. After "researching" some on other bike with this style, I also pulled the trigger on a 6" wide Manta Ray fender:


      I've also finally taken off the fender struts here too. The shock bolts have a sliiiiight taper to them which made them not seat home all the way without the struts acting as a spacer, so I just threw on some washers to hold space so I can bolt it all up fully for now.

      And on the bike, the plan is to rock simple mid-height shotgun style pipes, but on the left side. I got a head start on this with a portion of a rear cylinder crossover pipe... which I would expect is the most complex set of bends in the whole system.


      I already lopped off the end of this pipe and the exit of this pipe isn't really headed in the right angle, but its a good start.


      The general flow of the pipes hopefully will generally follow the upward angle of the primary tin top, and have a little kickout just before the shocks... and hopefully be really no wider than the shocks additionally.

      Oh yeah, I also ditched the S&S Teardrop air cleaner for a Chopper Dave's unit I found on ChopperSwapper...


      She's now a race bike.

      Comment

      • ericthebeard
        Senior Member
        • Jul 2015
        • 119

        #4
        I've been mulling this over a bit and there is a whole chain of dependencies that need to line up right, as I want to get the foot board (or pegs) places. But for that I want to have my butt position set. And for that I need a seat. And for that I need my seat pan done. And for that I need my fender mounted.

        -So-

        Fender mounting.

        I got the Lowbrow Aluminum fender on their black friday sale. Pretty stoked on it BUT I am not sure what extra considerations I need to make for it being aluminum. The sucker is good and thick, but I don't have a good intuition on what support it needs for passengers and gear riding on the back. Does anyone have experience with these finders?

        Searching around I find many people (rightfully so) making comment on how Al is pretty soft and brittle compared to steel, but not all fenders are created equal.

        Lowbrow's site mentions this when using the same fender for their salt racer project:
        "I wanted to make strong mounts as the .125" aluminum fender needs to support the weight of a passenger as that is where the rider sits on this purpose-built race bike."
        Specializing in custom motorcycle parts and accessories for Chopper and Bobber motorcycles. Aftermarket parts for Harley Davidson Sportster, Triumph Bonneville, Yamaha XS 650 and many more. FREE SHIPPING ON ALL US ORDERS OVER $99!


        And looks to be simply bolting right to the fender, no weld in bungs or anything like that. Just through-bolted to a 3/8 domed bung:


        Now, that's a hardtail. My main thoughts are to make external fender struts flowing out of the drop-seat castings, not unlinke these from Jeff Wright of CoC (though, less speed-holey likely, and I know this is a chopped up shovelhead seat casting... ):

        [IMG=600x800]http://3.bp.blogspot.com/-umI8bultOPc/UuWPhpyvv0I/AAAAAAABAew/1lBN0c8gdPs/s1600/1.jpg[/IMG]


        My fender will be cut back to stop at the high-noon position if not slightly shorter, but much more landing area for an extra butt or duffle than the one above.

        My main question is: what do I need to do for strength? I FEEL like cantilevered struts with maybe an internal arch between the aft-most mount points should (could?) be sufficient, just sandwich-bolted through the fender?

        The next step up from there would be to weld in bungs to the fender to distribute the bolt hole loads and relieve possible cracking at that point.

        The next from there would be welding in internal bracing.

        These last two are problematic as I don't have much Al welding capacity in house other than buying an alloy spool for my wee MIG and just go for it. Or if its really needed I'll seek out a pro with a TIG for this simple part of the job. But is it necessary?

        There's your OCD post of the day.
        Last edited by ericthebeard; 01-19-2016, 12:52 PM. Reason: shrinking the huge m'fer image

        Comment

        • ericthebeard
          Senior Member
          • Jul 2015
          • 119

          #5
          Onward regardless... There is incremental work to be chipped away at.

          It's hard to even get a sense of proper chopper-dress-up with the fender at full circumference. First order of business was to get an initial cut on the fender, both to get it a more manageable size and, more to the point, to get a practice cut in with this material. See how it works, what doesn't work and so on...

          Measure thrice, something reasonably orthogonal:

          IMG_2940 by Eric Bott, on Flickr

          Tried marking it with blue tape for a cut line, with a "cut to" side marked:
          IMG_2941 by Eric Bott, on Flickr

          LOCK IT DOWN

          IMG_2942 by Eric Bott, on Flickr

          I spent a while setting up the cut, trying to find a way to immobilize the big boy and position the cut line to my body well.

          Note: this may be trivial (no, this is trivial) for many of you. But this is my journey and I'm loving every minute of it.

          Anyhow. Motherf(*&^er is strapped to a milk crate with an old military surplus cam strap, which is clamped to the bench. Then I went at it with a cutoff wheel. Just like the old days in Beirut.

          Reasonably clean cut, and I get a bonus mini fender with a name tag:

          IMG_2944 by Eric Bott, on Flickr

          Seriously considering filing it down to "Bro Tom", mounting it, and re-christening the bike. Sorry Zodiac...

          Also, BroTom looks pretty good on there, very Narrow Strike Eagle-ish

          IMG_2947 by Eric Bott, on Flickr

          I may mount the nub initially and run that, the main reason I want the longer tire coverage is for a potential passenger pillion and/or gear landing pad (though sometimes its hard to tell the difference).

          Comment

          • ericthebeard
            Senior Member
            • Jul 2015
            • 119

            #6
            Meanwhile, playing chopper dressup with the "main" fender section:

            IMG_2957 by Eric Bott, on Flickr

            Lets just say I learned a lesson on proper grinder use...

            IMG_2990 by Eric Bott, on Flickr

            In conjunction with dorking around with fender alignment and positioning, I got a jump on the seat pan.

            Started with basic patten making using file folders... quickly figured out that they are a bit too flimsy for my use and methods. I was taught pattern making for wooden boat construction and interior fitting, so I just copied the logic to choppering? Who knows, did I mention I have no ideas what I'm doing?

            Picking up the initial width for the first flat section. I wanted the edges of the seat to hit right in the center of the tube sections.
            IMG_2978 by Eric Bott, on Flickr

            Picking up various angles and taping bits and pieces for fitment rather than trying to cut everything to size right off.
            IMG_2981 by Eric Bott, on Flickr

            IMG_2982 by Eric Bott, on Flickr

            The first drop seat section:
            IMG_2983 by Eric Bott, on Flickr

            Hinging on the rise section:
            IMG_2985 by Eric Bott, on Flickr

            Just playing with curling the material for the final run off the strut ends:
            IMG_2987 by Eric Bott, on Flickr

            After the aforementioned hole in my jacket, I transferred the first flat section to some sheet (12 ga hot roll) and cut it on the band saw. Then cleaned the lines up on the bench sander, which worked very well. nice crisp lines.

            Def going to round out the sides more. I'm not going to narrow up the frame on this bike like the VCP "The Saint" or Narrow Strike Eagle, but want the seat waist to cheat it a little and bring the eye to a narrower line, even if it means leaving a little muffin-top of tubing poking out...

            IMG_2992 by Eric Bott, on Flickr

            Before I get along much further I need to get some spacer sections between the plate and the frame to account for paint and upholstery on the final seat.

            Oh, and mount the fender so I can figure out the "pommel" for the seat. Going for something like a cobra to mild scorpion-ish rise... well see.

            Comment

            • ericthebeard
              Senior Member
              • Jul 2015
              • 119

              #7
              Lets see here... where did I leave off?

              First off, got some parts in from auctions and other shenanigans.

              Scored a killer deal on this black mid-star rear wheel:

              IMG_3073 by Eric Bott, on Flickr

              The chopper fairy also dropped off a late model juice drum:

              IMG_2997 by Eric Bott, on Flickr

              IMG_2998 by Eric Bott, on Flickr

              Came with a rear axle, all the sleeves and spacers needed (I think, anyway) and the lug bolts.

              IMG_2994 by Eric Bott, on Flickr

              With the new rear wheel coming in I gained a little more wiggle room in my one-car garage to maneuver the bike around on the dolly sans wheels. I never really had good access to the left side of the bike. Since I'm building left-side high pipes, I really wanted to be able to take a standoff from the bike when mocking them up to dial in the flow...

              This also mean I get a new perspective on the scoot in general:

              IMG_3021 by Eric Bott, on Flickr

              IMG_3022 by Eric Bott, on Flickr

              Then started on the pipes... something I'm really excited about and intimidated by, mostly because I *really* want them to be as sick as they look in my head.

              We'll see.

              First off some basic mockup and tinkering with some welding rod to get an idea of the bends I will need.

              IMG_2996 by Eric Bott, on Flickr

              Careful observers will double check my math and realize I f'd up. Mixed up radius and diameter when ordering... but really I just had to buy the tightest bend I could find for the initial loop on the front head, to loop back, up, and to the left to exit on above the case deck and stay inside the frame.

              It seems that Paul Cox is the only one I've seen that builds left side high pipes with any regularity. I love the look, and the totally uncluttered right side as a consequence.

              This is what I'm somewhat going for for the pipe lines (Cox's Barracuda)


              Comment

              • ericthebeard
                Senior Member
                • Jul 2015
                • 119

                #8
                Playing around with general positioning with some random straight bits.

                IMG_3029 by Eric Bott, on Flickr

                IMG_3031 by Eric Bott, on Flickr

                IMG_3032 by Eric Bott, on Flickr

                IMG_3033 by Eric Bott, on Flickr

                Comment

                • ericthebeard
                  Senior Member
                  • Jul 2015
                  • 119

                  #9
                  Aaaaaaand now we're more or less up to date with reality... thanks for playing!

                  Comment

                  • Blackbetty
                    Senior Member
                    • Apr 2011
                    • 1341

                    #10
                    Fuck ya man good thread. Not enough dudes out there building swingers!

                    Cool you went w the alloy fender. I never thought to use them bc I usually run sissy bars and need to weld on them. My alloy skills on the tig are weak....

                    My buddy has this swingarm ironhead - His little toenail fender is attached via bolts and through holes. I think there are two hidden at the bottom, and then a bolt at the rear of the seat. The seat is bolted to the frame and contributes to the fenders stability. Pretty solid setup.


                    Last edited by Blackbetty; 01-19-2016, 8:39 AM.

                    Comment

                    • brooklynbomber
                      Senior Member
                      • Sep 2011
                      • 1944

                      #11
                      Would you ever consider a round pan head swing arm? Square one just looks a little off on what seems to be a nice bike so far

                      Comment

                      • ericthebeard
                        Senior Member
                        • Jul 2015
                        • 119

                        #12
                        Originally posted by brooklynbomber
                        Would you ever consider a round pan head swing arm? Square one just looks a little off on what seems to be a nice bike so far
                        Totally, the square one is a turd on there for sure.

                        I already have a round swingarm in hand now for the build. Need to chase some threads on the axle adjusters (3/8x24 NF is really easy to buggar up it seems) and get hardware on it. I also need to get the clutch basket and primary cover out of the way so i can get access to the pivot bolt... chopper problems.

                        Comment

                        • ericthebeard
                          Senior Member
                          • Jul 2015
                          • 119

                          #13
                          Originally posted by Blackbetty
                          Fuck ya man good thread. Not enough dudes out there building swingers!

                          Cool you went w the alloy fender. I never thought to use them bc I usually run sissy bars and need to weld on them. My alloy skills on the tig are weak....

                          My buddy has this swingarm ironhead - His little toenail fender is attached via bolts and through holes. I think there are two hidden at the bottom, and then a bolt at the rear of the seat. The seat is bolted to the frame and contributes to the fenders stability. Pretty solid setup.
                          Thanks man, I read yours over many times too. I hope this can be good for peeps too.

                          I like the lines of that fender, thanks for posting it. The current plan is to get some Al internal bracing all mocked up and ready to rock, then take it to a TIG wizard somewhere and just pay to have it done right.

                          But... who fucking knows, I've made and re-made plans for this bike over and over. Whatever happens will happen.

                          Ultimately all I want is a decent lil spot to land a lady butt or secure gear back there. Nothing too wild.

                          Comment

                          • brooklynbomber
                            Senior Member
                            • Sep 2011
                            • 1944

                            #14
                            Just know that the pan swinger will drop the rear by a bit. You could do a swing arm mounted fender so that it hugs the wheel and wouldn't have to worry about bottoming out with a lady on the back. But it moves with the wheel so gear and or passenger would move also.

                            Comment

                            • dlandberg
                              Senior Member
                              • Nov 2015
                              • 135

                              #15
                              Great bike and cool project!

                              Comment

                              300 mobile ad bottom forum

                              Collapse
                              Working...
                              ;