Simple Shovelhead Build Thread

Collapse

Desktop Ad Forum Top

Collapse

Mobile ad top forum

Collapse
X
 
  • Time
  • Show
Clear All
new posts
  • nowhitebelts
    Member
    • Jul 2010
    • 47

    Simple Shovelhead Build Thread

    What's up cultists,

    I'm kicking off a new build thread for this project. I'll try to document the process as much as possible and post hi-res photos to keep it juicy. This is my first solo build, so your input is welcome and I will be asking a lot of "what's the best way to do X?" and "Where does this washer go?" type questions. All help, ideas, input and opinions are welcome.

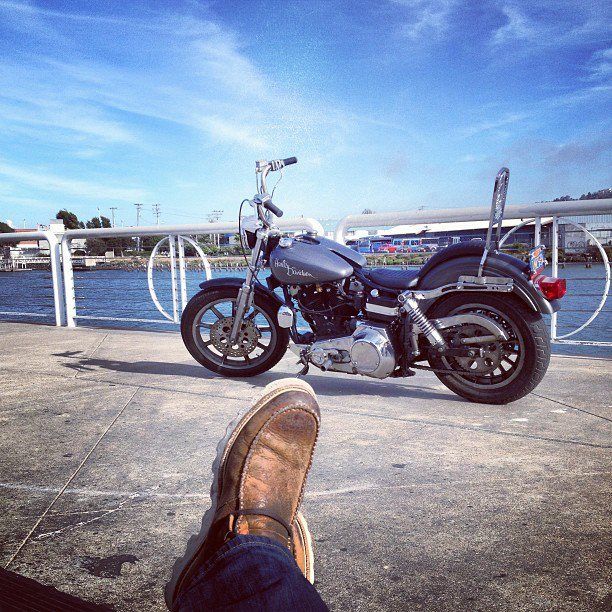
    This bike started life as an 1978 80" FXS. Eventually I got tired of it's bullshit and decided to tear it all the way down and do it right.

    Here she is before teardown.


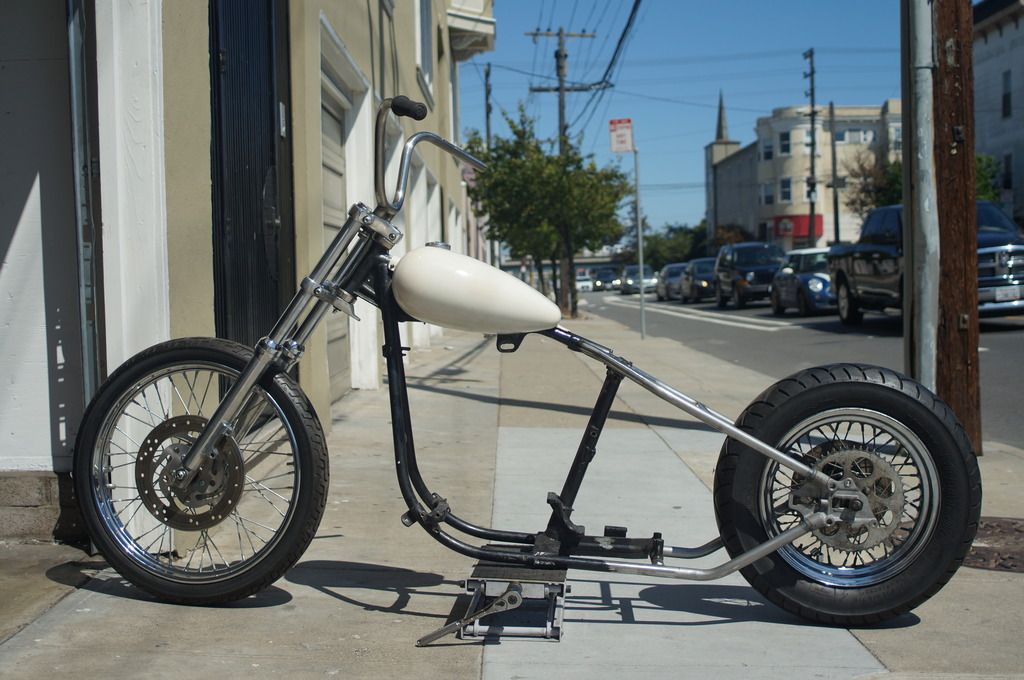
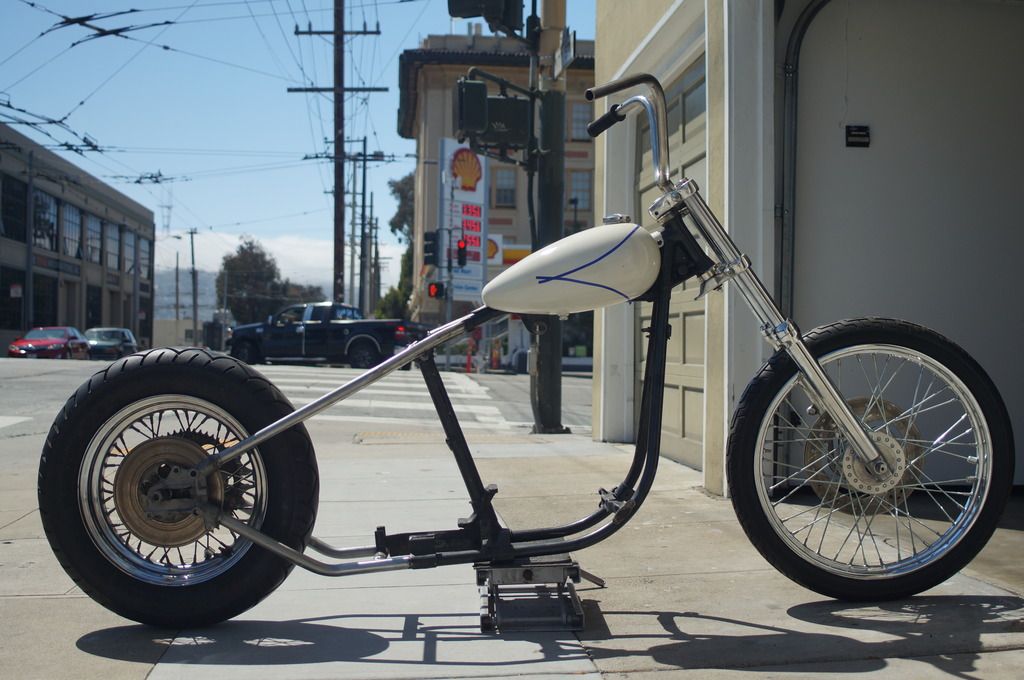
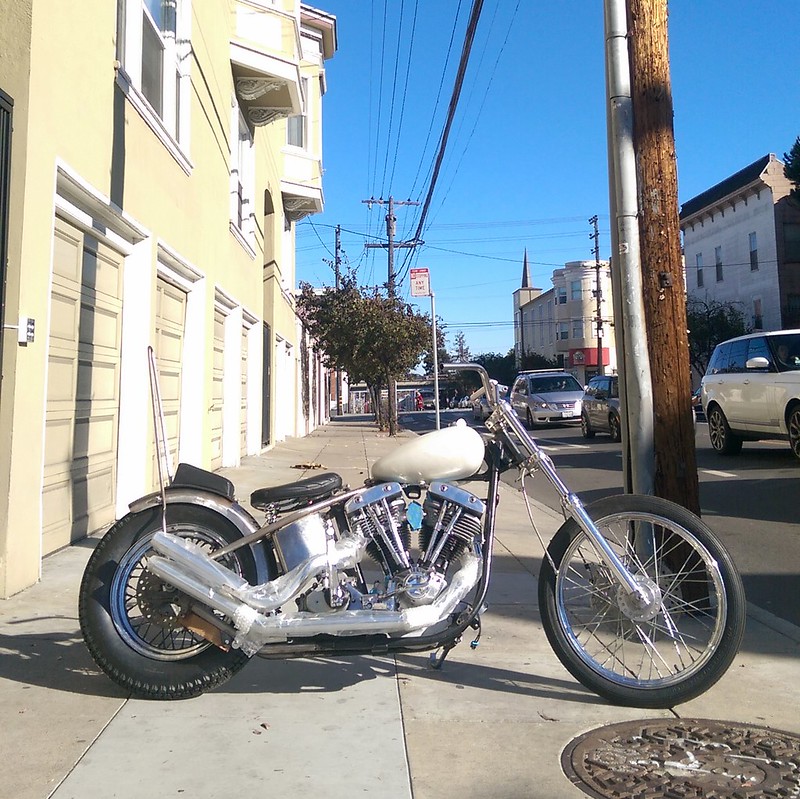
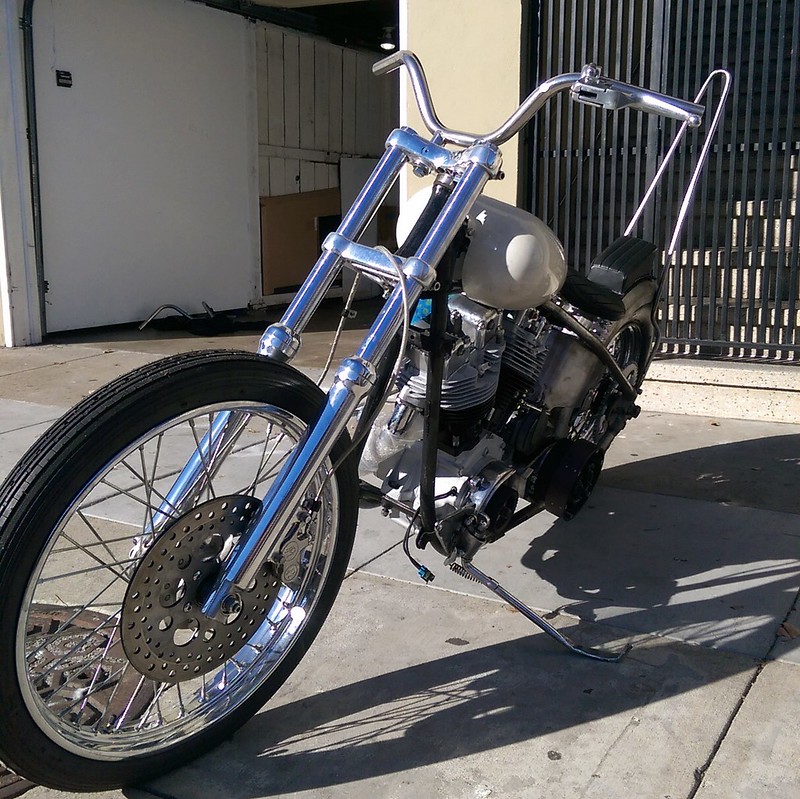
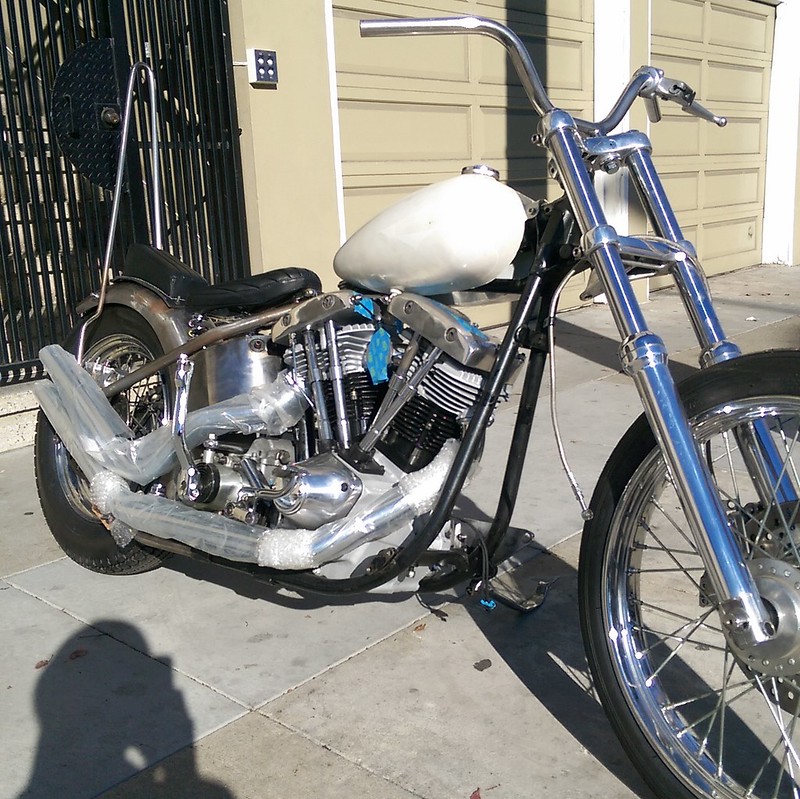
    Here's how she sits today.


    Details for the build are as follows:
    - 80" HD Shovelhead completely rebuilt from the cases up by JLK Performance Machining in San Bruno, CA. Andrews AB cam, stock compression, built for reliability and easy starts. With breath through a CV.
    - 4 Speed Ratchet trans
    - Frame hardtailed by Fab Kevin. Great dude, great work.
    - 16 rear 21 front with discs and PM Calipers. Have Avons that will get mounted soon
    - Gasbox fender
    - Deep tunnel mustang tank
    - 2" Haifley Solo seat and P-Pad likely (would love anyone's thoughts on these and on whether the 1" or 2" is a better option)
    - Horshoe oil tank with built in filter (anyone have experience with these? Good, bad, ugly?)
    - Primo 1 1/2" belt and pro-clutch
    - Lowboy bars by SPCL79 (not going to run the mini-apes)
    - Pipes, mounts, sissy and all other work by me.

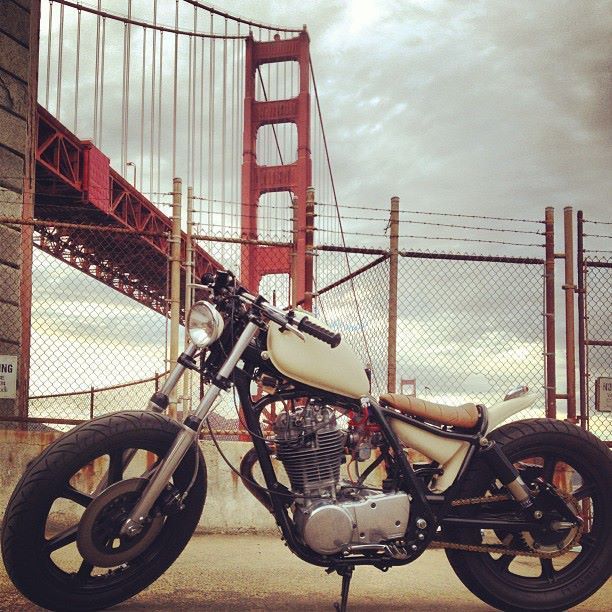
    Here's the first bike I built with my buddy Andy. 78 SR 500. I learned a lot from him and from that project. Hoping I'm now ready to take off the training wheels. We'll see.

    Attached Files
  • nowhitebelts
    Member
    • Jul 2010
    • 47

    #2
    Like I said I wanna share as much info on process as possible for any other curious rookies out there. One thing I can talk about since it's already done is fork leg shaving.

    It's a dead simple process and just takes time, easy to do yourself and I find metal polishing to be weirdly satisfying. Feel free to pile on if you have other tips.

    1. Cutoff the ears for fender mounts, caliper, whatever with an angle grinder cutoff wheel. Don't go buck wild with the grinder, leave enough material on there so that you can work down a flush surface with files.
    2. I use a couple flat files, one double cut and one single cut. Super simple stuff. Be aware that files work in one direction, if you don't know how to use a file, Al Gore invented YouTube so you could learn. Use the double cut file to remove material until you get your surface damn near flush. Then switch to single cut to get a smoother finish. Clean the file often, it'll get loaded up with Aluminum.
    3. Now sand your ass off. Start at 220 grit. Get a small tub of water and wet the paper to keep it clean and minimize aluminum boogers. Take your time with each grit, any scratches you can see at 220 won't go away as you move up the grits. When you get to 400, take time to get out all the tiny scratches from the 220, and so on up the chain... I go up to 1500 to cut down on polish time. This is good mindless work to do while you watch TV or something.
    4. Buff those suckers. I use a soft and a firm buffing wheel on a small bench grinder. I use mothers mag polish with the soft wheel and simichrome polish with the firm wheel. Don't use that red jewelers stuff unless you want a fine coat of it on everything in your shop including you. Use firm pressure and medium wheel speed. Never wear gloves when operating bench machines.

    Comment

    • Bo
      Senior Member
      • Aug 2010
      • 175

      #3
      What did you do with that seat? I just picked up a 78 FXS that I'm cleaning up. What other parts off that bad boy you still got?

      Comment

      • crush1776
        Senior Member
        • May 2011
        • 779

        #4
        Nice looking SR and I like what you are doing here. Personally I wouldn't go with the filter in oil tank, they just look new and EVOey to me. Horshoe top fill tank would be the cleanest IMO.

        Comment

        • nowhitebelts
          Member
          • Jul 2010
          • 47

          #5
          Seat is an old gold cobra. I have most of those parts. Just sold the cobra. But sissy bar, covered shocks, tins, wheels, I got it if you want it.

          Thanks for the tip on the oil tank. I'll think about it. Picked up a filter tank cheap and it seems like it kills two birds with one stone. If it looks cheap I'll go another direction, probably a stock tank, maybe black.

          Comment

          • nowhitebelts
            Member
            • Jul 2010
            • 47

            #6
            New update. Got a more substantial mockup with motor, trans, new oil bag and crappy cardboard sissy bar template. I have some questions below that I'd appreciate your thoughts on!

             photo IMAG0278.jpg

             photo IMAG0277.jpg

            The oil bag is a re-pop piece from flea-bay/Taiwan. Seems heavy duty, but it's creating some space issues. Has anyone modded these to create space or do people go with the shorter TT repop tanks that seem to give an extra inch of clearance? Help me chopcult, you're my only hope:

            - Looks like there's only about a 1/2" of adjustment room for the trans before it bumps the tank which seems like a big issue.

             photo IMAG0284.jpg

            - There isn't room for the clutch cable to pass through between the trans and the oil tank

             photo IMAG0281 1.jpg

            - Fittings seem real close to the heads, I'm less concerned about this since I'm sure I can route the lines properly, but overall it just feels a bit crowded.

             photo IMAG0285.jpg

            Last question for now. Is this the proper positioning for my trans plate? Bought a v-twin adjuster plate and I'm having a hard time finding info on how it's oriented and how the adjuster tab factors in.

             photo IMAG0286.jpg

            Comment

            • RichardS
              Member
              • Jun 2015
              • 77

              #7
              nowhitebelts,
              Couple/4 observations to answer your questions:
              1: Try "spacers" (1/2"-?) under the front of the oil-tank......then you won't have to heat/bend the clutch-release-lever.
              2: Transmission-plate up-side-down.......you won't need the "adjuster" if you are using a cast-aluminum inner-primary. Transmission-plate would have a bracket and "adjuster" to screw into the rear of the transmission-case if you are using just the "bearing-support" (but not really required/you can adjust "primary" chain/belt by levering back the transmission with the five mounting-nuts/bolt semi-loose.).
              3: Might have to secure the rear of the oil-tank to the fender (similar to earlier HDs).
              4: On the oil-lines.......yes, they were close using a "horse-shoe-tank" on a rigid......they usually went behind the exhaust-pipe to the oil-filter......just run them downward/behind the exhaust and you'll be fine.

              Comment

              • nowhitebelts
                Member
                • Jul 2010
                • 47

                #8
                Ok,

                More interesting updates coming soon as I head into fabrication. Two quick questions that I've been scratching my head over:

                - I'm replacing the studs that hold the bearing support plate / inner primary to the trans (4 speed ratchet) with bolts so I can properly space out the mids I'm using. What is the thread size on these studes where they go into the tranny? Looks like it's 3/8" 14 but it that seems really odd. I'm hoping it's 3/8" 16 and the studs I have are just a little clapped out, but I don't want to fuck up the threads in my trans, so let me know!

                - I got a trans plate from V-Twin and the front holes are threaded, the mount below is also threaded. Hardware kits come with a carriage style bolt for the front mounts and it is just not adding up for me. Was planning on just drilling out the threads int he plate and running a bolt through. Is that OK, am I missing something?


                Your help is mucho appreciated.

                Comment

                • JohnnyRainbow
                  Senior Member
                  • Apr 2012
                  • 2188

                  #9
                  You need this for the front of your oil tank.


                  And this for the rear of your oil tank.

                  Last edited by JohnnyRainbow; 08-09-2015, 11:55 AM.

                  Comment

                  • nowhitebelts
                    Member
                    • Jul 2010
                    • 47

                    #10
                    Thanks Johnny Rainbow, thats in the plan!

                    Comment

                    • nowhitebelts
                      Member
                      • Jul 2010
                      • 47

                      #11
                      Hey all,

                      Just wanted to post a photo update as it's been a while. Fabrication and dry assembly is done. Next stop frame powder coat, paint and final assembly. I'll have some questions about motor setup and break in and wiring that I'll share soon.

                      IMAG0437 by [url=https://www.flickr.com/photos/137638090@N03/]

                      IMAG0436 by [url=https://www.flickr.com/photos/137638090@N03/]

                      IMAG0444 by [url=https://www.flickr.com/photos/137638090@N03/]

                      IMAG0442 by [url=https://www.flickr.com/photos/137638090@N03/]
                      Attached Files

                      Comment

                      • nowhitebelts
                        Member
                        • Jul 2010
                        • 47

                        #12
                        Just wanted to post an update. Bike is nearing completion. Sorry for the lack mid-build progress updates, I was focused on getting things done. That said, I'm happy to answer any questions folks may have.

                        Paint with abalone inlay by Jim Moser of Grass Valley, CA.


                        Attached Files

                        Comment

                        • jgrady1982
                          Junior Member
                          • Sep 2015
                          • 9

                          #13
                          The exhaust looks like just what I want for my bike. Did you make them or buy the exhaust pipes?

                          Thanks

                          Comment

                          • Davestune
                            Senior Member
                            • May 2014
                            • 3292

                            #14
                            the paint work is absolutely stunning, your bike came out real nice
                            good job man......

                            Comment

                            • panheadpete
                              Senior Member
                              • Oct 2011
                              • 370

                              #15
                              Beautiful bike and I love seeing chops with brakes

                              Comment

                              300 mobile ad bottom forum

                              Collapse
                              Working...
                              ;