
 Tweet
Tweet
For the kids on the "Show Your Helmet..." thread that asked for it, here you go.
How to paint your helmet in the latest recycled fad, with rattle cans, in just a few simple steps, with your host... some guy. (I am not a real painter, so you probably shouldn't listen to me. This is just some shit I busted out in my front yard to see if I could do it.)
First. Surface prep is pretty critical. So, pull the edging off, peel all the guts out, and sand the shit outta that bitch. It's not gonna get any smoother than what you start with, so make sure you're happy with all the chunked out spots before you ever start layin' any paint on there. Once it's smooth, wet-sand with 220.

I didn't photograph the primer, because I didn't think it was that important. But, I used a hi-build, just to help smooth out any sanding marks. Do what you want here... primer is primer, as far as I know. Wet sand your primer, again with 220, and make sure it's smooth as silk stretched over your mother's ass.
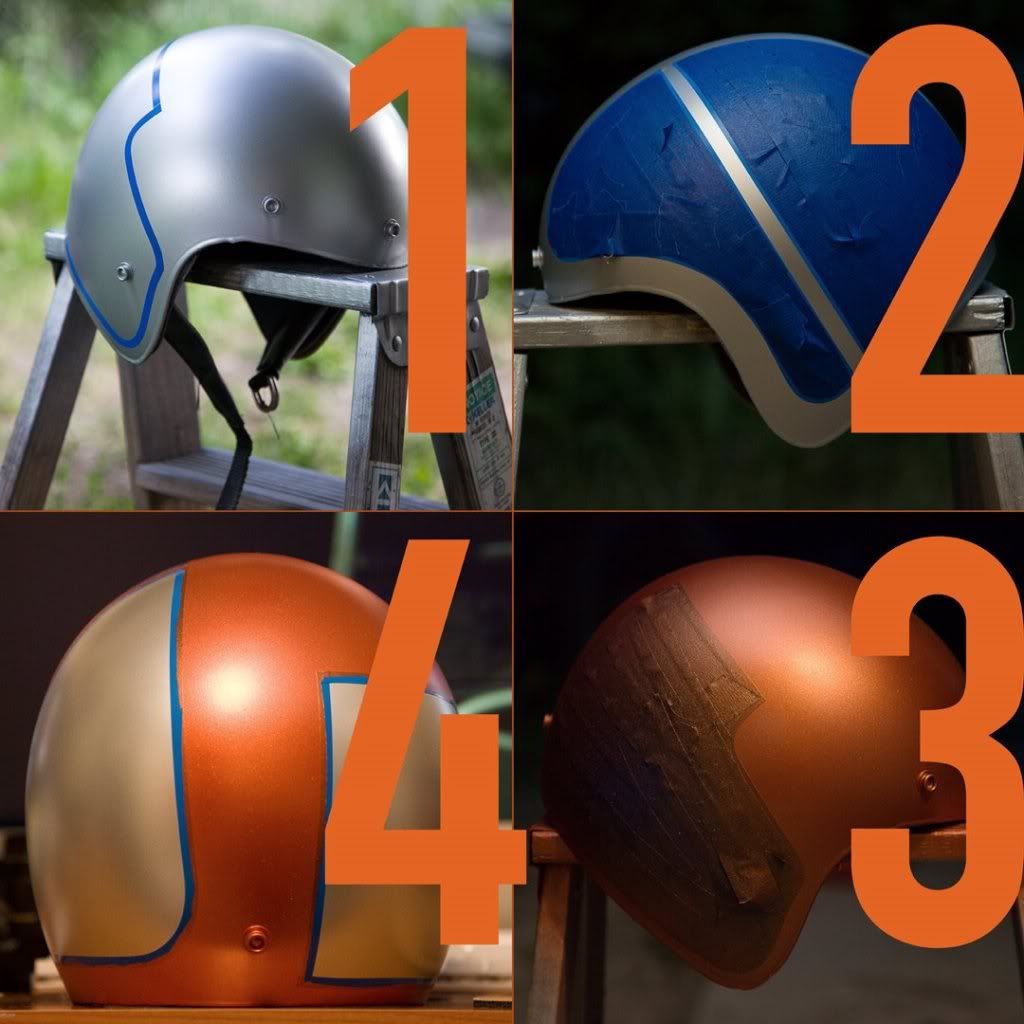
Once you're sanded and primed, you can start the fun shit.... follow the photo below, clockwise. It's tricky like that. I've added numbers for all those young kids who never learned how to read an analog clock because they were too busy learning how to apply eyeliner like Jared Leto.
1 - Lay down your base coat, let it dry, then tape out your design. I used a flakey silver, in hopes that it would brighten everything that went on top of it (it did). The candy's also look fantastic over, and it makes for a nice, bright pinstripe. But this is art... do what you want.
Same goes for taping your design... get wild. I wanted to stay pretty simple, blocky, and geometric with mine. Make sure you go to a real paint store and buy real tape... it stretches into your curves way better than anything you're gonna find at Checker.
2 - Mask that shit. I started by masking the graphic areas off... but do it how you feel it. I used the blue masking shit from the Sherwin Williams section at Home Depot... it's low tack, so it won't peel all your hard sprayed layers off.
3 - Spray your non-graphic area color.
Once you're dry, peel your mask... you should be looking somethin' like photo 4. Careful not to peel your striping tape, because then you'll just be straight up shit creek without a goddamned paddle. And that's a bad place to be... so don't fuck it up.
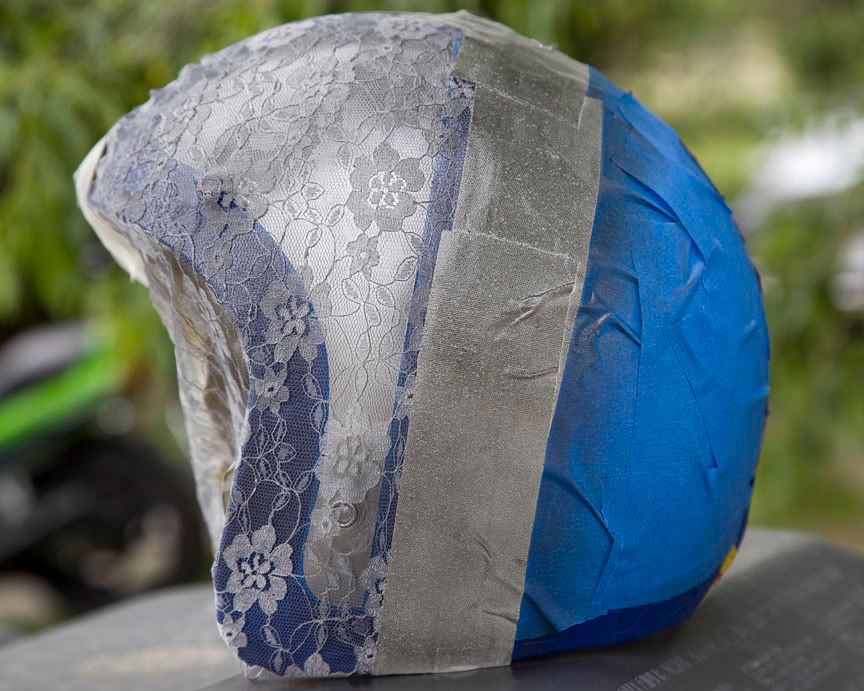
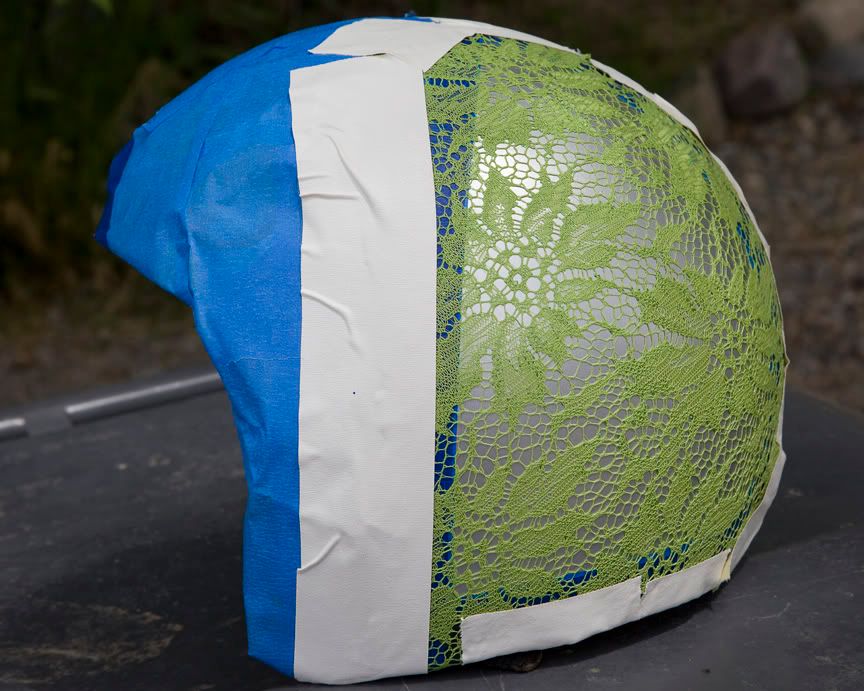
Set that aside for a minute to cure. While you wait, call your Grandma and get the low-down on what fabric stores have the best lace options. Go buy some, and keep in mind - when painting a helmet, that shit's gotta stretch over a dome. So look for stretchy. If there's not enough stretch, you're gonna have a hard time... especially on big panels.
Once you're home with your fancy new lace, mask off everything except the panel that you're gonna be sprayin'. I used two different laces on the left side of my helmet... first the front panel, then the back. Patience is a virtue... spray one, let it dry, peel it, change your mask, do it again.
Oh... this is probably important. You're gonna have better results if you use a transparent paint. I used Duplicolor's Metalcast line... first I laid smoke over the lace, peeled the lace, then laid orange and gold over the entire panel to mellow it out.
How to paint your helmet in the latest recycled fad, with rattle cans, in just a few simple steps, with your host... some guy. (I am not a real painter, so you probably shouldn't listen to me. This is just some shit I busted out in my front yard to see if I could do it.)
First. Surface prep is pretty critical. So, pull the edging off, peel all the guts out, and sand the shit outta that bitch. It's not gonna get any smoother than what you start with, so make sure you're happy with all the chunked out spots before you ever start layin' any paint on there. Once it's smooth, wet-sand with 220.

I didn't photograph the primer, because I didn't think it was that important. But, I used a hi-build, just to help smooth out any sanding marks. Do what you want here... primer is primer, as far as I know. Wet sand your primer, again with 220, and make sure it's smooth as silk stretched over your mother's ass.
Once you're sanded and primed, you can start the fun shit.... follow the photo below, clockwise. It's tricky like that. I've added numbers for all those young kids who never learned how to read an analog clock because they were too busy learning how to apply eyeliner like Jared Leto.
1 - Lay down your base coat, let it dry, then tape out your design. I used a flakey silver, in hopes that it would brighten everything that went on top of it (it did). The candy's also look fantastic over, and it makes for a nice, bright pinstripe. But this is art... do what you want.
Same goes for taping your design... get wild. I wanted to stay pretty simple, blocky, and geometric with mine. Make sure you go to a real paint store and buy real tape... it stretches into your curves way better than anything you're gonna find at Checker.
2 - Mask that shit. I started by masking the graphic areas off... but do it how you feel it. I used the blue masking shit from the Sherwin Williams section at Home Depot... it's low tack, so it won't peel all your hard sprayed layers off.
3 - Spray your non-graphic area color.
Once you're dry, peel your mask... you should be looking somethin' like photo 4. Careful not to peel your striping tape, because then you'll just be straight up shit creek without a goddamned paddle. And that's a bad place to be... so don't fuck it up.

Set that aside for a minute to cure. While you wait, call your Grandma and get the low-down on what fabric stores have the best lace options. Go buy some, and keep in mind - when painting a helmet, that shit's gotta stretch over a dome. So look for stretchy. If there's not enough stretch, you're gonna have a hard time... especially on big panels.
Once you're home with your fancy new lace, mask off everything except the panel that you're gonna be sprayin'. I used two different laces on the left side of my helmet... first the front panel, then the back. Patience is a virtue... spray one, let it dry, peel it, change your mask, do it again.
Oh... this is probably important. You're gonna have better results if you use a transparent paint. I used Duplicolor's Metalcast line... first I laid smoke over the lace, peeled the lace, then laid orange and gold over the entire panel to mellow it out.


Comment