Brad's '75 Shovelhead Chopper Build Thread

Collapse

Desktop Ad Forum Top

Collapse

Mobile ad top forum

Collapse
X
 
  • Time
  • Show
Clear All
new posts
  • jbswear
    Senior Member
    • Jul 2013
    • 337

    Brad's '75 Shovelhead Chopper Build Thread

    Hi, folks. I just found out about this site a few days ago. I've been working on rebuilding a dead chopper my dad built back in '75 for several years, and just *might* get it running by this fall.

    Here's the basic history:

    He bought a crated FLH engine from a Harley dealership in California in 1975 and built a bike around it on his boat while he was in the Coast Guard. At some point he changed the frame (to what I have now), which then changed the titled year to 1978. In 1981, the dreaded left-hander-in-an-intersection took him out. The front forks were tweaked, rim damaged, and his ankle was badly twisted. He was a construction worker, with four kids (I'm the oldest), so into the shed it went.

    It sat for the next 27 years, until I talked him into giving it to me. My dad has only owned Harley's bikes (aside from a Triumph chopper he built decades back) and I've never owned a Harley. I don't ever plan on buying one; I love sport standards too much. Had this been a chopped CB750 or GS1000, I'd still want to resurrect it: My dad built it.

    When I got the engine, transmission, tanks, and frame, it was in SORE shape. I eventually had to tear apart the entire engine and replace all the internals--during its years-long "rest", condensation got into the engine and destroyed it. The transmission was shot, so I bought a used one in a slightly less poor state and completely rebuilt it.

    Side note: Prior to this project, the most complicated, in depth project I ever accomplished was replacing fork springs in my SV650. I learned a LOT on this Shovelhead project, which is where www.shovelhead.us/forum comes in--most of the members there are old graybeards who walked me through it, saving me thousands in labor and parts by either holding my hand as I fixed something or sending me parts for dirt cheap (such as a perfectly serviceable rotating assembly for the cost of shipping).

    Anyway, now that you're all bored with my story, I'll start posting up some porn, er, uh, build pics.


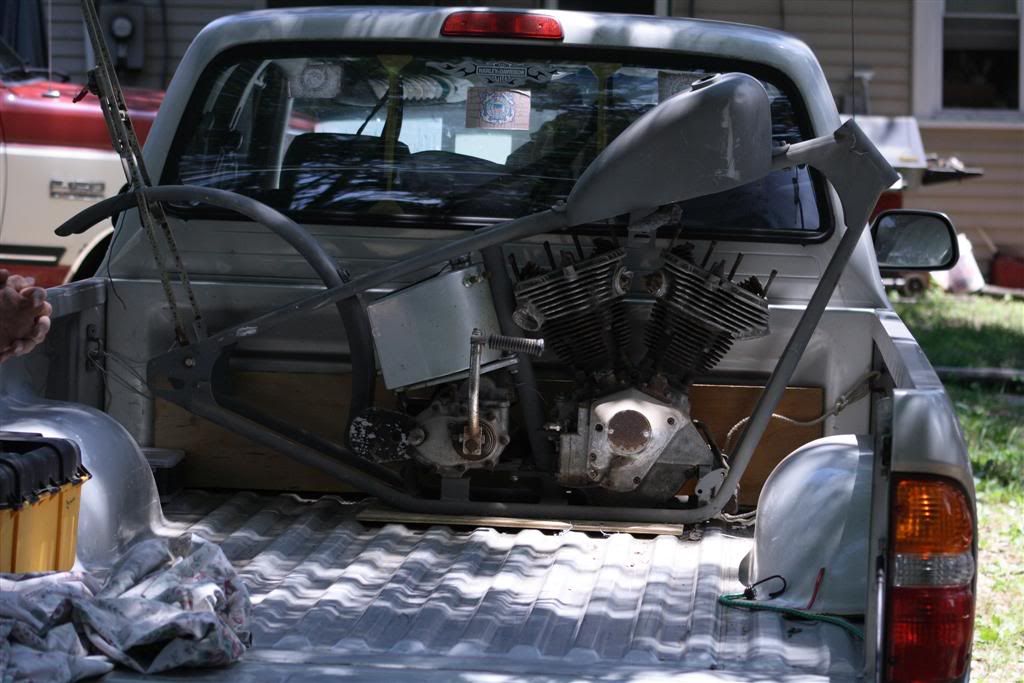
    The bike, as my dad delivered it. Mind you, he drove from TX to MD to bring it to me:


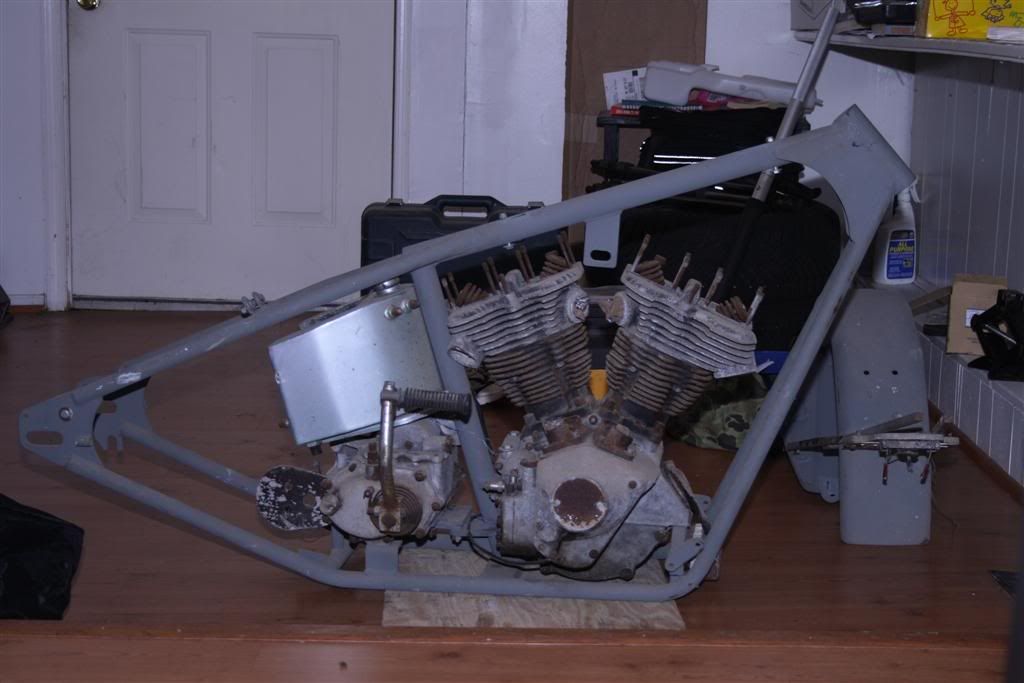
    In the house I was renting at the time:


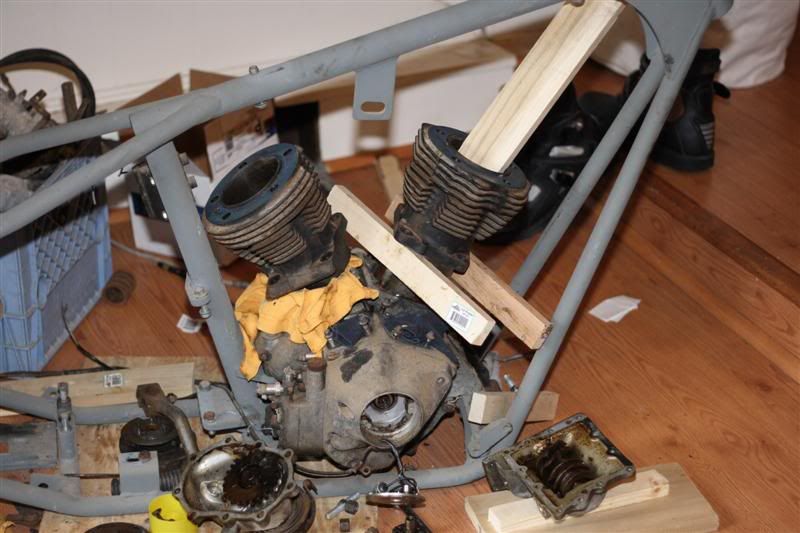
    Remember where I said I didn't know what I was doing? Here's how I got the cylinders free from the pistons--lumber and a rubber mallet. I'd knock the piston in one cylinder down a bit, lift the cylinder, and place a block of wood on it. Repeat. Took more than two hours, and I had blisters when done.


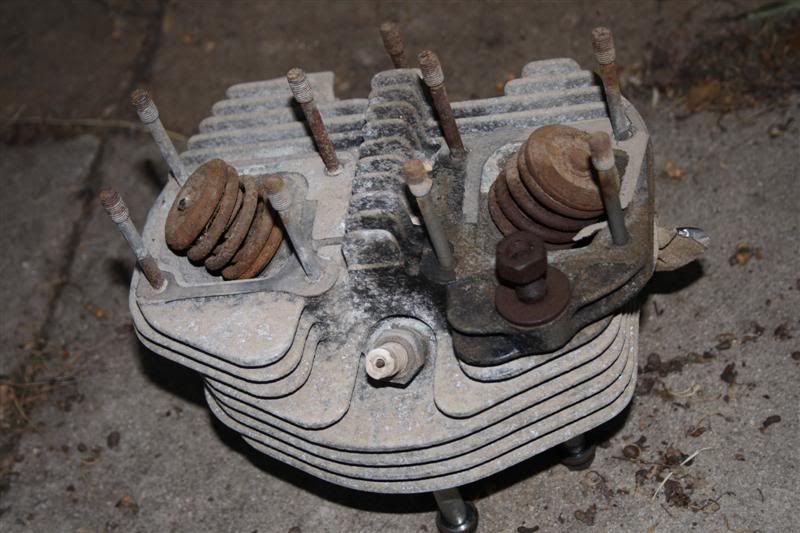
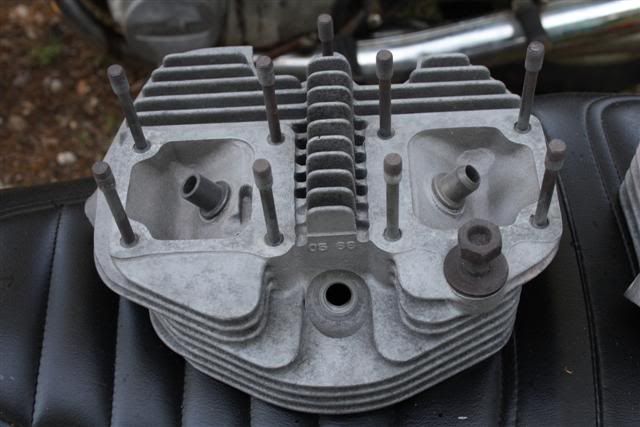
    A close up of a head to show how badly it was corroded:


    After having it blasted, it looked new:


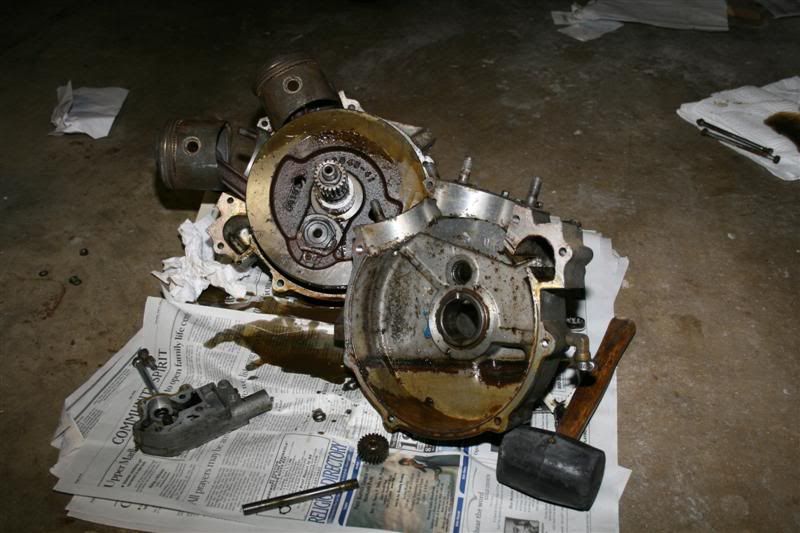
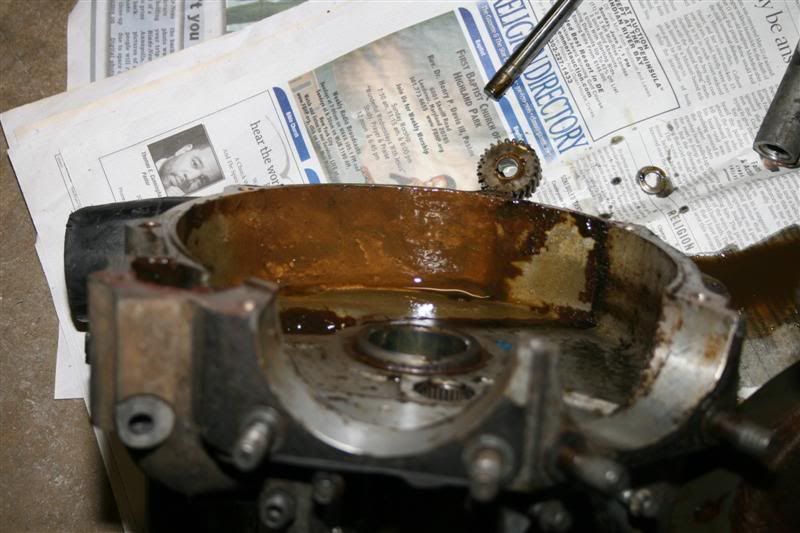
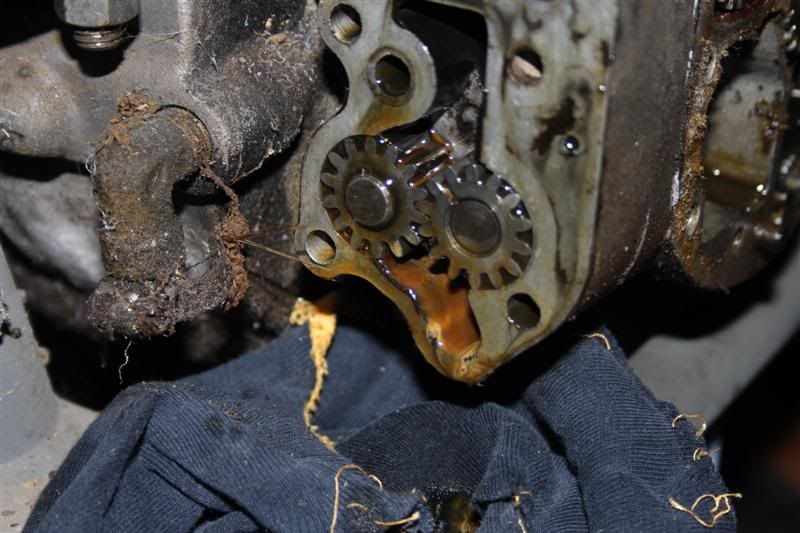
    At this point, the bike was put aside, as I didn't have the money to keep working...it needed LOTS of EXPENSIVE parts. So, about three years later I finally got started again. At this point, I finally opened up the lower case and found water in the oil:


    Next post will start showing improvements and the beginnings of hope.
  • jbswear
    Senior Member
    • Jul 2013
    • 337

    #2
    A member at the Shovelhead forum GAVE me a rotating assembly for the cost of shipping. He had bumped his displacement from 74" (stock) to 96", and this had been on his shelf for two years.


    I sent it out to Truett and Osborn in KS to have it balanced and fitted with .010" over pistons to match the overbore they did to clean up my cylinder walls.

    I began painting the engine.

    Before and after soda blasting pics:


    Painting is to begin (new crankshaft assembly installed):


    Next will be the transmission rebuild.
    Last edited by jbswear; 07-08-2013, 9:04 AM.

    Comment

    • jbswear
      Senior Member
      • Jul 2013
      • 337

      #3
      I bought this from my local indie for a bit more than I should have, but I didn't have to spend too much getting it running.


      Metal in the oil. Fuck me.


      Here's where that metal came from; the kicker clutch was worn:


      Also found that two gears on the main shaft were damaged at some point, so they were replaced, too.


      The shift clutches' leading edges were worn beyond their limits:


      The shift arms were worn a bit more than I liked:


      Most of the other gearing inside was in good shape:


      I found that the circlip that's supposed to hold the shift pawl in place was missing, so it could move up and down freely. Dunno what kind of damage this added to it all, but I promptly replaced it:


      I replaced the worn gears and shift arms, put new roller bearings in it, and buttoned it up:


      More improvements to come!

      Comment

      • jbswear
        Senior Member
        • Jul 2013
        • 337

        #4
        The original carb on the bike was shot. It was a piece of crap, too, so I didn't mind giving it away for the cost of shipping.


        I replaced it with a CV from a '97 Harley Evo, rejetted for the Shovelhead. Dad had a Maltese Cross tail light, so I decided to go a bit overboard with my air cleaner...


        That mofo is made of stainless steel. It's heavy! Stiff bracing will be needed to support it.

        Comment

        • jbswear
          Senior Member
          • Jul 2013
          • 337

          #5
          Some head work I had done:

          I had the gasket surfaces milled perfectly flat; they were off a few thou each, and while the gaskets *should* account for it, I wanted it to be perfect. Anyway, milling off a tiny bit will give me more compression, right? No worries, I'm still WELL within safe distance to keep the valves from kissing the pistons. Also had the bolt holes recessed for a better fit.


          One of the (many) weaknesses of this engine design is that it only has ONE friggin' bolt on the exhaust manifold to support the pipe. Not only that, it's threaded directly into the ALUMINUM head...older engines ALWAYS show wear there; they strip out. This engine only had 3k miles on it, so they were still nearly perfect, but I decided to drill them over sized and install Helicoils and studs.


          Over sized studs to show the fit:


          I also had the heads milled for dual plugs, as the plug on the side of a HIGHLY domed piston makes for a crappy flame front.


          On top of that, I had another weakness fixed--external oil returns. For those that don't know this engine layout, oil goes from the pump to the rocker boxes, down into the heads, and then down a passage in the cylinder to be dumped back into the crankcase. The problem with that cylinder's passage is that it's only 1/8" from the interior of the cylinder; the oil gets VERY hot. Not only that, but the joint between the head and cylinder is notorious for leaking. By plugging the original drain point and milling and installing external returns, that chance of leaking is removed AND the oil will stay 20-30* cooler.

          Last edited by jbswear; 07-08-2013, 9:08 AM.

          Comment

          • brooklynbomber
            Senior Member
            • Sep 2011
            • 1944

            #6
            WOW. You are committed. Very awesome that this is all in the family and the feeling after you fire this up for the first time will be amazing and probably be very special to know that your father had once twisted the throttle to the same engine and cruised down the road. Keep up the hard work, it will all be worth it in the end.

            Comment

            • JohnnyRainbow
              Senior Member
              • Apr 2012
              • 2188

              #7
              Nice. What kind of front end are you going to run?

              Comment

              • jbswear
                Senior Member
                • Jul 2013
                • 337

                #8
                And now, six years after I got it from my dad, I'm finally starting to assemble the bike. Here's the roller beside my SV650 to show how crazy long it is (8'4"):


                While they aren't yet mounted, it'll have dual discs up front with Brembo 4-pots to stop it. I bought them from another rider on another forum. The front rim is a 3x21 and the rear is a 4x16.


                I'm not going to use the OEM location oil tank. Instead, I'm mounting up a custom tank in front of the frame, almost identical to the one on this bike:


                Here's the kit I bought from a seller on eBay; I had a buddy of mine weld it and PC it.


                Comment

                • jbswear
                  Senior Member
                  • Jul 2013
                  • 337

                  #9
                  And here's where I sit now:


                  I just found out that I need to have the oil pump drive shaft bushing replaced. Once that's done, I'll finish up the engine and post pics of that.

                  Comment

                  • jbswear
                    Senior Member
                    • Jul 2013
                    • 337

                    #10
                    Originally posted by brooklynbomber
                    WOW. You are committed. Very awesome that this is all in the family and the feeling after you fire this up for the first time will be amazing and probably be very special to know that your father had once twisted the throttle to the same engine and cruised down the road. Keep up the hard work, it will all be worth it in the end.

                    That's what keeps me going! The missus doesn't understand why I want to rebuild this thing. She just can't fathom it!


                    Originally posted by JohnnyRainbow
                    Nice. What kind of front end are you going to run?
                    It's a Wide Glide with internal stops. Roughly 10" over stock length.

                    Comment

                    • FredoSNR
                      Senior Member
                      • Jun 2010
                      • 413

                      #11
                      Very cool man, must be awesome to be working on your pops' bike like this. Subscribed.

                      Comment

                      • jbswear
                        Senior Member
                        • Jul 2013
                        • 337

                        #12
                        I ran into another "speed bump"...

                        While trying to install the oil pump back onto the bike, I found that I couldn't get the outer clip into the groove on the pump's drive shaft to secure it in place...I can't figure out why.

                        You can just see the groove that's partially covered by the gear here:


                        And you can just make out that it's a few paper thicknesses shy of allowing the clip to slip in:


                        Here's the other end of that shaft; it supports the driven gear that connects to the pinion off the crank shaft:


                        A little back story--when I pulled the engine apart, it soon went into boxes...and into storage. I lost the original oil pump drive shaft. I bought a replacement recently. I fear that it's about .02" too long, which is what's giving me fits. There *is* the slight chance that the bushing that the shaft rides in shifted to the right a tiny amount, but I cannot figure out how that might have happened. It's recessed about .025" from the outer face of the engine case (where the oil pump attaches), but the spec allows for .04" slop.

                        So, to save more head ache and to gain peace of mind, I took the engine to my local indy to have him figure out what's up. I have the mechanical aptitude to put things together, but not enough experience to trouble shoot things that don't happen often. I'd rather have him fix it, anyway. If I screw something up, and that bushing starts spinning in the case, it'll destroy the right side case completely.

                        Comment

                        • jbswear
                          Senior Member
                          • Jul 2013
                          • 337

                          #13
                          Last year I decided to clean up the breather window on the engine case. For those that don't know, the Shovelhead engine uses a "dry-sump" lower end--there typically (and shouldn't be) any more than 4-6 oz of oil in the case when the bike is running. The excess is constantly forced out of the lower end by the pressure build up of the pistons' down stroke. The window "opens" at the bottom of the stroke, allowing the pressure to force the oil into the oil pump to be cycled. It's often referred to as "scavenging the lower end". The window opens by means of a steel tube that has a gear on one end that's driven by the crank. At one point on the tube is a cutout section that's covered with a heavy screen or simple slots. It's located such that it only opens at the right time to allow the oil to escape.

                          The window is a sloppy job, at best, with bad cutting and sloppy casting marks. When the engine's displacement is increased from stock, often times the builder will "time" the window by grinding it larger. This is correctly done with a timing wheel attached to the crank to show when it should be opening. Cut it too big and you've just ruined the engine case. It's not a delicate operation, and you have to be pretty damned ham fisted to fuck it up, but it can happen.

                          For now, my engine is to stock 74", so I didn't need to increase the size, but I did want to clean up the sloppy casting marks to all the oil to scavenge faster.

                          The lower left is the "breather gear"--the tube with the window in it:


                          Here's the original window. It's not rectangular to match the screen on the breather gear. Notice the screen inside.


                          Ugly casting marks:


                          Measuring the outer edge of the window to ensure I don't go too far:


                          Taped off other areas to prevent aluminum shavings from mucking things up:


                          Window shaped properly:


                          Also cleaned up some gnarly slag from the case's wall:

                          Comment

                          • jbswear
                            Senior Member
                            • Jul 2013
                            • 337

                            #14
                            As part of the external oil return work, some other milling was required, but it was really more a bit of cussing when I messed up, stripped some threads, and had to fix them.

                            With the oil returning through the cylinder wall passage, it dumps directly down into the case below. With the external returns, the oil is coming in perpendicular to the case's wall, so the case had to be drilled AND the cylinders' skirts had to be drilled to allow the oil to pass through.

                            I marked the case where I wanted the passage to go. For cosmetic reasons, I chose the center of the cylinder decks. Predrilled:


                            Drilled and ready for tapping:


                            Tapping with lots of oil:


                            Oil nipples (Summit) installed:


                            I lined up the skirts and marked them with a marker, then drilled through on my drill press.


                            Teflon taped nipples ready to mount into the heads:


                            The socket *just* fits in:


                            Fuck me! Stripped the threads. Ever wonder how much of a bitch it is to remove a stripped fitting that just spins in the hole instead of coming out? Add to that zero-clearances because of cooling fins you don't want to break off. And that were freshly painted. Did I mention fuck me?


                            The culprit:


                            No worries, though. I was able to retap and insert it. I pulled the head off and blew out any debris first, though.

                            Last edited by jbswear; 07-18-2013, 8:32 AM.

                            Comment

                            • jbswear
                              Senior Member
                              • Jul 2013
                              • 337

                              #15
                              On the cases of the preceding engines (Panhead, Knucklehead), there was drain bolt installed on the left case. The was really only used as a diagnostic tool--you pulled the plug after the bike had been sitting a while to see how much oil was in the case. If more than 6 oz, you needed to inspect the oil pump's check valve to see if it was leaking oil into the case. The check valve is nothing more than a hardened steel ball held against seat with a stiff spring. Oil pressure allowed flow one way, but once the engine was shut off, the spring is supposed to force the ball against the seat.

                              In theory, at least. It's inefficient at best, and prone to failure. It's easy to find and cheap to fix, though.

                              The Shovelhead's cases are nigh identical to the Panheads', so much so that they still have the boss for drill the drain plug's location. One major flaw, though: the case there is rather thin. It's easy to strip it out, so I don't plan on using this much.


                              Comment

                              300 mobile ad bottom forum

                              Collapse
                              Working...
                              ;