The Butter Glide 454ltd..slightly NSFW

Collapse

Desktop Ad Forum Top

Collapse

Mobile ad top forum

Collapse
X
 
  • Time
  • Show
Clear All
new posts
  • Jetblack
    • Apr 2024

    #61
    Originally posted by Greenmachine
    Really digging the cobra seat on this bike. +1 on the duplicolor rattle bomb too used that stuff on my last racing quad motor and it held up great there so it should hold up really nice on a street bike.
    Oh yeah it takes a thrashing and lays good and thick, I suck at painting so if it can make my shit look ok... that's all needs to be said about it's being good shit.

    Man the seat has been my nemesis on this bike bought 3 made 2, first one was ok but wide at the front spreading my hips out at the joint fine on the pegs but feet down it sucked, second one seemed ok, but my boney ass got sore with the thinner foam and the pan steel bent too easy, first made seat fit great looked like what I wanted but had me my nuts resting on the gas tank and feeling bunched up, second made seat never posted on here was just all out butt fucking ugly, I made a black middle and did orange sparkled vinyl as the main color oh man I have never seen such a hideous seat as that was.

    So I found this cobra, I think it's an old drag specialties, same construction just no labels. The guy I bought it from said it sat on a backroom his shelf for a lot of years getting moved around so much it wore through a tad on one edge and dusty as fuck, he couldn't remember where they got it from it had been so long ago, but it was designed to go on a shovel. It's ok but I may get a DS scorpion to see how that feels on it at some point I like back support.
    Comment

    • Wolfie
      • Apr 2024

      #62
      Yep mine are Keihin CVK34's too. What kind of shit are they giving you? I'll be happy to help you sort them, are you running open intake and exhaust? I'm a Keihin carb fan myself. If you really wanna get that beast going flatslides. But yeah, hit me back with what your set up is and the problems you're having and I'll help ya knock the gremlins out.
      Im runnin Emgo pods, and stock Streetglide muffs....stock jets I think, was a barn find....(I like quiet at my age, lol, thats why the Streetglides)....but I mostly been havin problems with the floats stickin...PITA too, on my VN theyre siamesed...share the body....I been backblowin em thru the drain, and its worked for 2 yrs, but Im still gettin stickin floats, which ends up in my crank, and I end up gettin pissed and wanting Kunis, lol....this winter, I'll be working on a custom manifold to switch to a single carb setup....mebbe a 40 or 42mm.....for now though, mebbe just the needle seats got worn ?...its an 85...beat to crap by the PO, lol....

      Comment

      • Jetblack
        • Apr 2024

        #63
        Alrighty, should be able knock this out without taking them off. You have two vacuum ports in the bank of carbs yeah? The one furthest from the petcock should be blocked off, and if you have a vacuum operated petcock the closest vacuum to it. Hoses, In the middle of the carb bank the top T is the overflow line port, bottom T the fuel line port.

        To knock out the sticky floats, stop fuel flow, drain both carbs and fill them with liquid seafoam local autoparts place should have it, for super dirty carbs a 2 or 3 day sit with it in there, overnight should be enough for sticky float issues, after it's sat full of that drain it off don't want to burn the dirty shit. Pour some seafoam in the gas tank to mix in with your gas to burn through it, it'll smoke like a fucker for a awhile burning off all the carbon build up. It's basically a on the bike carb cleaning, and running seafoam through will clean out all the build up shit out of the head and pipes. I run a bit in every 3rd tank full to keep the system clean.

        Open up the caps on top and carefully remove the diaphragms finger in the middle works great, if they tear you're gonna lose vacuum in the carbs so just be gentle. Get the needles out, it's most likely not a notched needle you want to put a small brass washer under each needle, if the diaphragms don't want to fit let them sit fuel makes them swell, so if you can let them rest or be gas free they should shrink back down and fit fine, if not it may pinch when the caps go back on creating a vacuum leak.

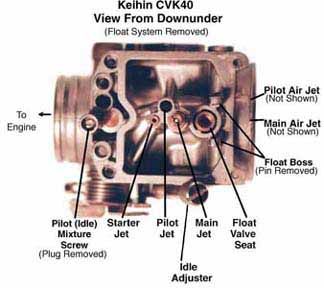
        The shim on the needles is going to wake up the bottom end and give it throttle response, the needle taper is leaned from the factory so raising it puts it in where it should be. If you get mid range bogging for some reason(shouldn't with the pipes you're running) but if you do raise the float levels 1mm more than stock. And my suggestion for (A/F / Pilot) screws is 2 full turns out from a lightly seated position. If you haven't then you need to remove the plugs to get at the A/F (pilot)screws... not a picture of the carb but give you an idea where the plugs are if you need to remove them.


        Those things should be right as rain after that. If you discover any tears or pin holes (hold it up to a light) in the diaphragms when shimming the needles they need to be replaced for proper vacuum.

        About jets, if you have a good top end and it pulls hard to red line at wide open throttle, the stock size is fine. What I like about these carbs, if tweaked right they will pull smooth and hard from zero all the way through the rpm range without a single stumble or hick up. The video above sucks, it was the second start after rebuild, I didn't have any tension on the idle knob, so I had to start it with throttle and throttle it to stay running.

        I need to make one of where it's at now it just sits and purrs happily, then growls like a demon cat on a twist.
        Last edited by Guest; 08-02-2013, 9:18 PM.

        Comment

        • Jetblack
          • Apr 2024

          #64
          Basic idle set and first roll under it's own power, beware of pants with pleats in the front they give you fake boners. Couple more weeks and it should be on the road, most of that time is going to be dealing with the DMV.


          Comment

          • Wolfie
            • Apr 2024

            #65
            Yeah, been usin SeaFoam fer years....theyre beyond that....I think itrs the needles/seats now at this point....checked both floats this past winter, and no leaks....I just wanted to try a quick fix to get the rest of the season in....wonderin too.....the choke( enricher) thingies, dont seem to be seating right. (stems)...sheee-it....that'd do it too, wouldnt it....just saw that today....is there an easy fix fer that ? (I tried WD40 on the brass shaftts).....

            ...btw bro....you need to try and put yer bike under some blacklight.....better yet, wonder if they make blacklight LED strips....fucker'd look awesome at night....

            Thanks man....but methings I need to yank.....I got another month before the next major group ride, and I gotta make that because could be my last....I can mebbe squeeze the short one in between gettin 1/2 the gas milage, lol....

            Ya know, gimme a DelOrto, or Bendix, Tillotson, or Amal, and I can make em sing again....Im all new to this Jap stuff, lol....too frickin complicated fer an old fart....

            Comment

            • Jetblack
              • Apr 2024

              #66
              Well pop those suckers off, I suggest removing all the brass dropping that in a small jar of acetone, unless there's rubber tipped float needles set those aside. Don't remove the bodies from the bracket no need to and more work to sync later. Then mix up a 50/50 mix of really hot water and pinesol and drop the bodies in there before you go to sleep, then pull them out and rinse them really good the next day. Pinesol will clean all the varnish and shit out brighten the aluminum and is safe on rubber parts, unlike a lot of other carb cleaners and solvents.

              If you can find a syringe suck up some acetone out of the jet jar and squirt it through all the little hole ports on the carbs. Then put all the brass back in, adjust the floats set the A/F screws 2 turns out(make sure you have in this order: spring, washer, tiny o-ring on the A/F(pilot screws) the lil O-rings like to hang up inside and jam the A/F mixture if not careful. Then slip a small washer under each needle to raise them up a tad. Sync them as follows:

              http://www.chopcult.com/forum/showthread.php?t=25532 slap em back on adjust the idle knob to enough tension to start it run it around to get it warmed up, then set the idle. You should be good to go after that for a good long time, just keep dropping some seafoam in it every few tanks to keep them clean.

              If I can find a black light I may see what some photos would look like, but don't wanna hook any up on it, kinda have a lot on there already with the indian guide light and fender skulls.

              Comment

              • Wolfie
                • Apr 2024

                #67
                I'll try some of that...thanks bro....once the snow starts flyin though....too many places to go still to have the bike down for any time....and its all I have...dont own a cage....I sprayed the enricher linkage down with Brakeleen, then blew it right off and followed up with a spritz of WD40....seemed to work.....for now.....and I found a crappy connection to my junction box from the front cyl pickup coil....fixing that helped a lot too....(I gotta put in a new 8 pin plug, part of this one melted) I got one......

                Them LED strips dont take a lot of juice, and I got mine switched, so it aint on all the time (VN700/750 stators suck)......I got mine under tank edges now, gonna add 2 more 1 each between tire and fender.....pic from StrangeDays2013...

                Last edited by Guest; 08-05-2013, 2:22 AM.

                Comment

                • Jetblack
                  • Apr 2024

                  #68
                  I can just imagine being on some kind of hallucinogen, seeing that in the dark and feel like a moth heading for a bug zapper I have some interesting idea's for the next build already, I need to get on the old 63' baby dream CA95 I have for another customization, maybe after this one, or after the CM185 it fits the era of what I have in mind, but the cat is staying in the bag for now.

                  This 454ltd sat outside uncovered for over 10 years the choke pins on it were frozen solid. Fortunately, the valves were all closed or I'd have had a stuck motor too... I thought it was at first but the fucking brake pads in the rear wheel had detached from sitting and were jamming up the hub. Hell for a 100 bucks with title I wasn't complaining.

                  I did a bit more paint shit today on it, I have a few more parts coming in, I put a 60's Honda 5 position key switch on it, for the time being, to run it, but I'm not digging it so another switch and a auto cancel signal unit should be coming soon. I'll have to toss up a photo of some of the new paint details, I was remembering some crazy lettering I saw some real old hot rod guy doing when I was a little kid, and I tossed some of that on it. Now I'm thinking of spreading the color scheme from that out, which adds a splash of bright yellow in the mix.

                  Comment

                  • Jetblack
                    • Apr 2024

                    #69
                    Alrighty, this fucker is taxed tagged, titled and road ready. Need to drain the shake down oil, put in some fresh, gauge is working great... loud as all hell. Took it for a run yesterday right before the 5 mile mark, the wire bundle jumped the box and went into the rear tire, I was able to get it back home before it shit the bed. Fixed the wiring and put the rear splash guard for the tire on the keep that shit from possibly getting at it again and reworked the electronics area.

                    This is the last update on the Wabi Saki / Venture Brothers tribute project, time to call it canned. It may be for sale or trade for the right offer in the not too distant future. I Need to finish up the paint details but that's pretty much it.


                    Here's a walk around light show.

                    Last edited by Guest; 04-26-2014, 6:58 PM.

                    Comment

                    • JetBlackII
                      • Apr 2024

                      #70
                      I didn't think to add rebuild shit to this thread when I swapped screen name business. Eh, now that I thought about it... some updates on the ol daily.

                      Here it is at my local with the new EX500 motor lining the basket...


                      I needed to handle the radiator fan switch and it's temperamental; work when it wants too from exposure to the weather, so I decided to open the whole can of worms and internal the wiring on the bars to clean them up a bit... and added a helmet lock to the sissy bar; so I don't have to babysit my helmet by constantly dragging that damn thing around off bike.


                      Feeding a lot of wires through holes and around angles almost the same bar diameter; is often a lesson in constipation, and this shit was no different. The idea to bother tackling the pain in the ass of cleaning up the bars from the control wiring; came from drawing this... I wasn't thrilled to be drawing the (sore thumb) bar wiring in it; to stay truer to actual form.


                      Could be better; but after several tedious hours of whatever... the good enough inner voice; starts demanding to be doing something else with my time.

                      Comment

                      • mclarkson
                        Senior Member
                        • Sep 2016
                        • 131

                        #71
                        I know this is an old, dead thread but I wanted to say how much this bike has inspired me and what a beautiful result you've gotten.

                        Comment

                        • Tayculla
                          Junior Member
                          • May 2017
                          • 1

                          #72
                          Hey man, not sure if I can hear it right on my phone but it sounds like you are only running on one cylinder man, stop playing with it while it's running, you need to yank the plug boot off and toss a spare plug in there and start it, if it runs the same do it to the others one, it probably won't run, see if you have spark on that side, if not it's easy to mistake the wires on the coil, maybe hooked up back wards, if you have spark and it is still not running yank the plug and smell it for gas, no gas, blockage somewhere in the fuel system, a problem can occurs if you lower the ride height to much in the back and not the front, carbs sit on too much of an angle in the wrong direction, so you have to change the carb boots from the stock angled ones to a straight boot or the floats in the carb do not work properly, and can leak gas out of the passageways in the front of the carb while not running, love the work you did to it, I have been trying to upload a pic of my 86 454 but it says the file is too big... I hope you check in here and see this post and it is of some help to you, ps, when it's running in your video, when you tried to crack on the gas, it should jus rev right up, not booog outline it does which makes me think one cylinder, but anyways good luck

                          Comment

                          300 mobile ad bottom forum

                          Collapse
                          Working...
                          ;