
 Tweet
Tweet
I was just working on making some forward controls and I wanted to know what you guys think of them. am planning on pressing a bearing between the arm and the heel bar and bolting on a 1'' tow bar
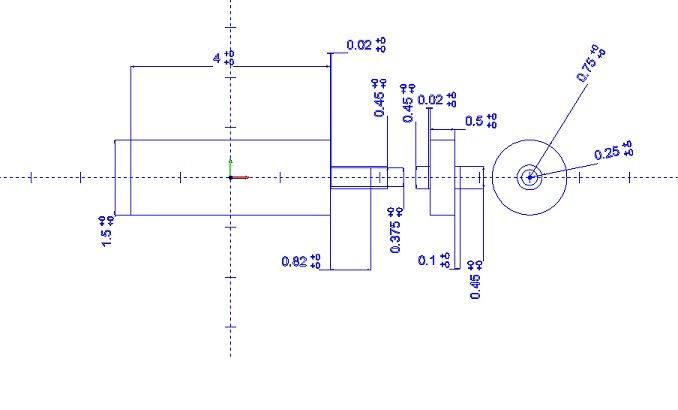


 there are some rough spots, only because after I had my external fixating halo removed from my right leg, I then quickly removed the extended foot pegs as well as extra bars that would keep my right leg in an upward position to help releive the fluid that would cause my right leg to balloon way out!! I have not ground off the stubs as well as the stubs that are now underneath the foot pegs that had exteneded foot pegs, I just recovered the foot pegs with new leather, and figured that the stubs would help keep the leather on the pegs, I have lost foot peg leather covers due to slopping used motor oil on the pegs to keep them lubed when I slop it on, it appears that even silcone gives way after a while with all the slop from my lubing techniques!!! On the long chopper, the vision of what is done is better, I use one inch tubing, then the next size up that slips over the one inch tube, I then cut the slippable tube into four very slender rings, then two wider rings, the wider rings are what will be moving on the one inch tubing, which will then have the shifter and the brake pedal welded onto the wider rings, I first put a very slender ring in place as to where I want the shifter to be, and weld the out side edge of the slender ring all the way around,and I do not weld the inner side of the very slender ring,I want my pegs and shifter to move, and welding both side could possibly stop the shift and pedal from having motion. then, I slip the wider ring up against the welded slender ring, then slide the next very slender ring up against the wider ring, and weld that very slender ring pretty tightly up against the wider ring, but only welding the outside edges of the very slender rings, you want the wider ring to be able to spin for now, after that is all welded up, the verty slender of rings, and you have the wider ring able to spin when you push with you pliers, then you weld on your shifter, also, this is when you decide whether you will have the linkage above the foot peg, or below, I traditionally put the linkage for the shifter below the peg. then you will have to weld on a tab with a hole drilled into it for the linkage, I usually use quarter inch steel rod that I bend to a ninety degree tilt, and drill eighth of an inch holes into the bent linkage rod, also making sure that you make your linkage long enough to shift and not go to far, length is very important here! I then take the stock shift lever and cut off the teenie peg, and then have a straight shaft for a shifter, I then drill a quarter inch hole into the shaft and put in the linkage all the while I drill an eighth inch hole into the linkage rod, and then after placing the linkage in the holes that are exactly the rods size, I put a washer on the linkage as well as a cotter pin, it is best to carry a few cotter pins that are new, never reuse them!!!and carry washers aslo!!! If anybody is near the area of Lodi, california, and would like to have a a live view of all these things, please come by!!! I do not care if anyone copies things I do, or just gets inspired by what I do but change it all together! I have seen a different type of linkage end that is rather clean looking, but, I always do what I can with what I have and that is simple to work with!! I do have to caution anyone who does come to see what kind of mess I do, you might get a bit inspired!!!! especially when it comes to leather work, and me, the way I do it, is pretty crazy, but legal!!!!!
 this red one is difficult to see, I welded the forwards on to the down tubes, which actually hides them in photographs, if you want to see all that I own and find worthy of taking photos of, go to my facebook, it is, swinewerx kelley I am lacking two of the bikes that came back, although the burgundy shadow came back as well, three came back and I find it hard to believe that they came back like boomerangs. I have come to the realization that I cannot even give away bikes for free, or with 500.00 plus a bike, they all return, but without the 500.00 I am planning on non opping the bikes I very rarely ride!!! I mostly ride my lobgest chopper, then my shortest chopper, then my in the middle chopper, the one in this thread is my middle sized chopper, then my burgundy shadow, is last!!! I would really like to know if it is because my bikes and choppers are total junk!!! They all keep coming back!!!! and thye usually hurt when they come back, the registration, is way past due, and the fines and such add up to around 500.00, what I gave the last three people with each bike, Or am I just way too nice??


Comment