If this is your first visit, be sure to
check out the FAQ by clicking the
link above. You may have to register
before you can post: click the register link above to proceed. To start viewing messages,
select the forum that you want to visit from the selection below.
There should be one heavy gauge wire (like the size of the ground wire from the battery's neg post) that bolts on to the side of the starter directly from the positive of the battery and then a smaller gauge wire from your ignition switch to the starter solenoid through the starter relay if you're using one.
Not sure if I follow ya. Isn't this how it's wired all ready if I leave it stock ( I picked up a push button for the starter all ready).
scott.
One of the common questions I hear quite a bit is "How do I get rid of all the bullshit wiring on my Evo Sportster"?
It's really not rocket science, especially on earlier ones but it can be intimidating to hack up the bundle of perfectly operating wires just for the sake of getting the bare-bones aesthetic.
For this thread we are using BF Josh's 2002 Sportster "S" model with dual plug heads. Other models and years will vary, but the concept will be the same. If you asked ten people how to do it, you'd probably get twenty answers, this ain't gospel, it's just the way I did it. And it worked, has way less snarl of an unsightly harness, especially now that more of the bike is exposed with a flat bottomed tank, fiberglass tail section, etc.
On Josh's stock bike there were no fancy sensors or other "nanny" switches that needed to be looped or disabled. This may be the case on later model bikes. We ditched the VOES petcock for an old Pingle one, and capped any open vacuum connections on carb or manifold with high quality rubber caps.
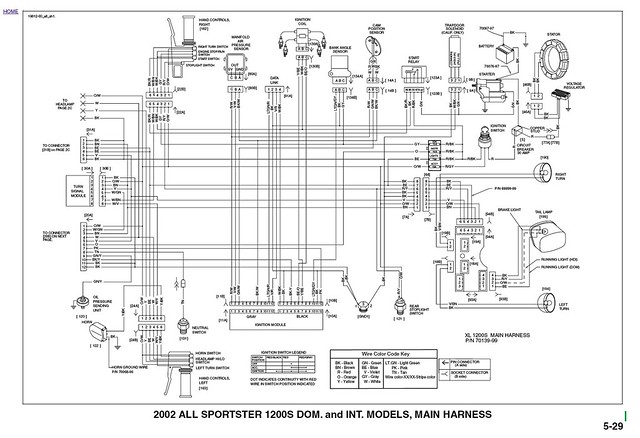
An extremely helpful thing is a factory wiring diagram. I was lucky enough to get one from a guy in PDF form. I blew it up and printed it out onto eight pages, taped them together and hung it on the wall where I was working for reference. Once I thought I was sure about what was going where, I highlighted the wires I was keeping and you can see how many that left for the trash. I did my FXR the same way and a 90's era sporty without one and it was way easier to have a real diagram to reference.
Tools needed:
Test Light
Crimpers / wire cutters
Dialectric Grease
Heat Shrink tubing 3/16" and 1/4" and a little 1/2"
Electric heat gun
Basic hand tools for removing mechanical parts
Butt connectors
Spade connectors
Ring connectors
1,000 Zip Ties
Two-position Toggle Switch
2) 30 amp resettable circuit breakers
1) 15 amp resettable circuit breakers
Blue tape
Sharpie
Note: Remember how I said everyone does things differently? I use circuit breakers and solderless connections. Most people use solder and fuses and the factory uses auto-reset breakers. I don't care for those because I can't tell when one has popped and standing around waiting to see if one resets seems too passive. I wanna know, then I can chase the problem and try to figure out if there is a short somewhere. A lot of old desert racers swear that solder can make the wires brittle and prefer crimped type connectors (and resettable breakers, ever see the dash on an off-road race car?) Anyway, it's worked for me in the past, so why change? On the subject of solderless connections, I use the good ones, with no plastic insulation. I put a little dab of dialectric grease in each one, make sure it is crimped properly and use the smallest heat shrink possible for a tight fit. If you like solder, use it. Same with fuses, but put them somewhere you can get at on the road, not under a tank that takes twenty minutes to pull off. For switches and breakers, try to find the kind with screw-on connections, use your ring connectors in the proper size and put a dab of silicone or liquid electrical tape over the conection once you are sure everything is hooked up in the right place.
Continued...
Billdozer I have some questions for you. I'm finishing up my harness and I want to wire in the low oil light and neutral into my speedo. I can use the check engine light as it is ground activated just like the oil light. Question is how do I test it with out taking all the oil out lol.
Secondly are there any of the other indicator lights such as the key or "p" for the neutral light? Just not sure they are 12v activated or not. I assume they would be.
Oh that's cool man, I appreciate the help! I just don't get why nobody's mentioned that once you put that solenoid starter button on, it's like you're halfway to hot wiring the bike. Is anyone else's like that?
If you do a google search on the 15 and the 30 you can use these part numbers:
19-166-15
19-166-30
I'm buying them through sandparts.com and using those part numbers will bring you directly to the specific breakers.
Unfortunately, shipping from this site is pretty high. So, at 7.50 a pop and shipping to east coast my total for two 30amp and 1 15amp is $37.xx (might look around to find a better deal.
EDIT: mooresparts.com has them for $6 and they come out to 33.xx with shipping to east coast. I'm going to check a good electronics store tomorrow to see if they have them as I'm not too keen on 7-10 business days for shipping when it's already over $10.
So I'm having a problem with my bike, I used the diagram for the 96 sporty, the bike fired up and ran, soil left it after that, down the road I go to crank it over again but no fire this time, um getting power to the coil and its cranking over bit I'm getting zero spark from the coil, so I replace the coil and still nothing. What's the best way to determine if its my ignition module or the cam sensor?
So I had this bike all running, went to finish up the rest of the bike and I had nothing. Figured charge the battery, next day, nothing. Bought an 89 starter, swapped it, nothing!
I have a solenoid button wired in, so it's either the starter or the battery. The 89 starter also has a screw out the top by the solenoid out? Dunno what the hell that is, a negative?
I'm stuck up shit creek w/o a paddle, n I really need help. I can't afford to wait another week, I've been hitting this thing hard since October! I wish I could post pics, but I have the gf,s iPhone , I'm fookign clueless. Btw I checked the grounds, the battery is new, starter is new, and I checked the bank angle sensor. Are there any other sensors that might throw a wrench In the mix?
I didn't run a relay, and pard all the wiring down according to this thread. It was running up until I fucked around with it n left the key on? I really have no idea. I'd love some input on it!
Scott.
That's all for tonight, I'll do the ignition switch and lights tomorrow after I proof this stuff to make sure I've got it right for ya.
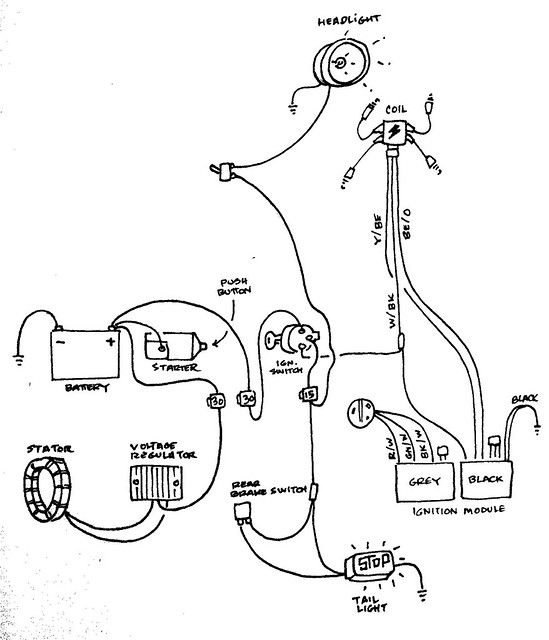
I have a quick question about Billdozer's hand drawn diagram. Couldn't both the ignition switch and voltage regulator be run off the same 30A circuit breaker? The original wiring has both these running off the 30A main fuse. Just trying to figure out if there is a specific reason for having two 30A breakers instead of one. Also, shouldn't there be a 15A circuit breaker between the ignition switch and coil like in the factory wiring? Getting ready to pare down the wiring on my 99 XLH1200 and want to make sure I have everything in order.
(Since this thread is a fucking cricket fest, I'm gonna chime in)
^^^^^^^^^^^^If I recall, there's all ready a stock dedicated automatic circuit breaker on the regulator. I'm guessing that the MOCO intended to keep these two circuits isolated from each other to prevent short circuiting the regulator.
So basically if you pulled all your shit out from behind the cover, you'd have the 30A fuse for your ignition circuit, then (I forget where) there's a 30A auto-breaker with a heavier gauge red and black only on that breaker that ties into the regulator. Hence the two 30A breakers.
I'd also assume that since both the IGN and REG are higher guage wires, they would both draw excessive amperage, you'd blow your breaker I'm sure.
BTW, oreilly's sells 30A auto breakers, I have had zero trouble with those. I bought my pushbutton 15A at marina supply, but I think oreilly's had them.
OH and I'm not running a 15A breaker to the coil, I guess if it doesn't exceed 30A it's ok? If you wanna be on the safe side it's probably not a bad idea, you could always just bypass it if it keeps popping the breaker.
I rewired my 89 sporty. The lights work but it does not start. I followed the diagram and it won't start now. I used these little guys as a start and kill switch http://www.jpcycles.com/product/3700070.
I think I did something wrong but can't figure it out. If I touch the wire from the starter button th battery it turns over and starts but if once everything is connected nothing....
The lights still work. No power loss. New Battery, checked the Stator.
There is no oil pressure light, neutral, turn signals or horn. I kept the breakers but replaced them.
The last pic I am a little unsure.
Last edited by BocaJRS; 09-22-2013, 3:43 PM.
Reason: Pictures
I rewired my 89 sporty. The lights work but it does not start. I followed the diagram and it won't start now. I used these little guys as a start and kill switch http://www.jpcycles.com/product/3700070.
I think I did something wrong but can't figure it out. If I touch the wire from the starter button th battery it turns over and starts but if once everything is connected nothing....
The lights still work. No power loss. New Battery, checked the Stator.
I am taking pictures and will be posting in a few.
Sounds like you have no power to your start switch.
rewiring an 06 rubbermount sportster ive got it all back together and it sparks for the first ten seconds of starting the bike then the spark gives out. Does it sound like the security system is armed? If anyone can help that would be great.

 Tweet
Tweet


Comment