CB550 Mad Maxer Build

Collapse

Desktop Ad Forum Top

Collapse

Mobile ad top forum

Collapse
X
 
  • Time
  • Show
Clear All
new posts
  • Demoto
    Senior Member
    • May 2011
    • 173

    CB550 Mad Maxer Build

    Started this build a few years ago as a restoration, but quickly got bored. Did the engine rebuild first. No real frame mods; lowered the front forks two inches, clip-on's, and cut off the rear frame loop to shorten things up. I wanted a custom tank, but lacked the metal working ability, so I cut the bottom off of a stock tank, lengthened it, and built a new top on it. My welding skills are pretty poor, so everything looks ugly if you get too close, but it kinda works with the style...I hope.
    My main goal with this bike was to build a good looking ride using as much cheap, raw materials and parts I had laying around as possible. I want to practice the 'make do' attitude my grandpa had rather than living a cushy, OEM life.


    Photobucket
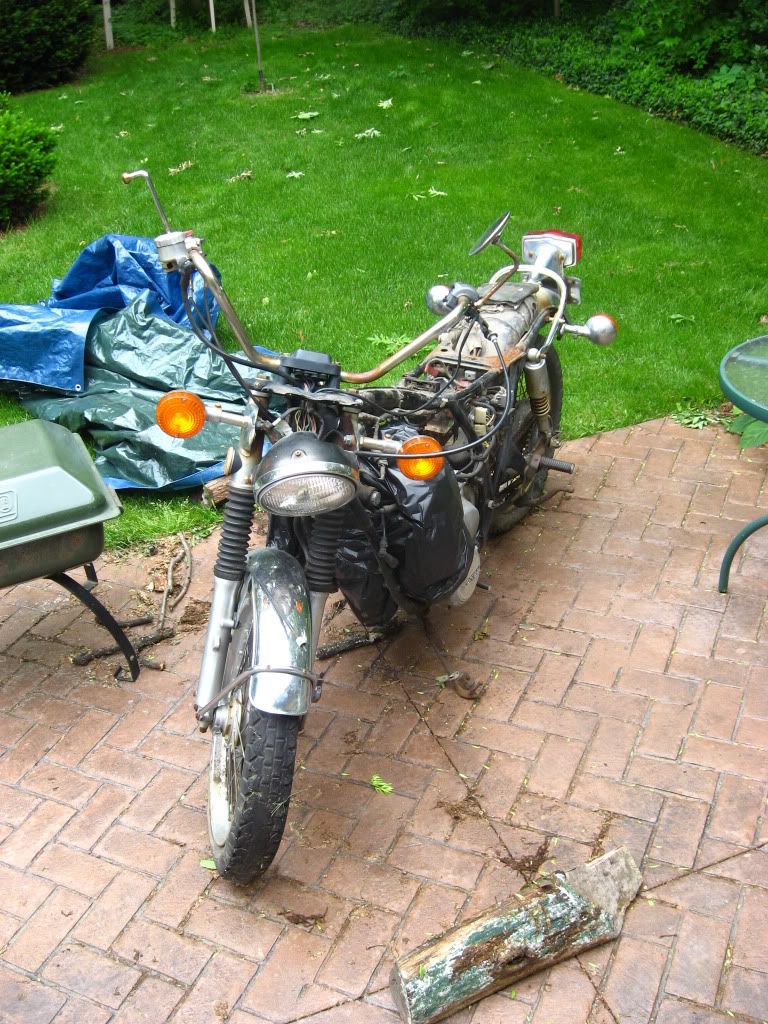
    How it looked when I got it. (Price $0.00)

    Photobucket
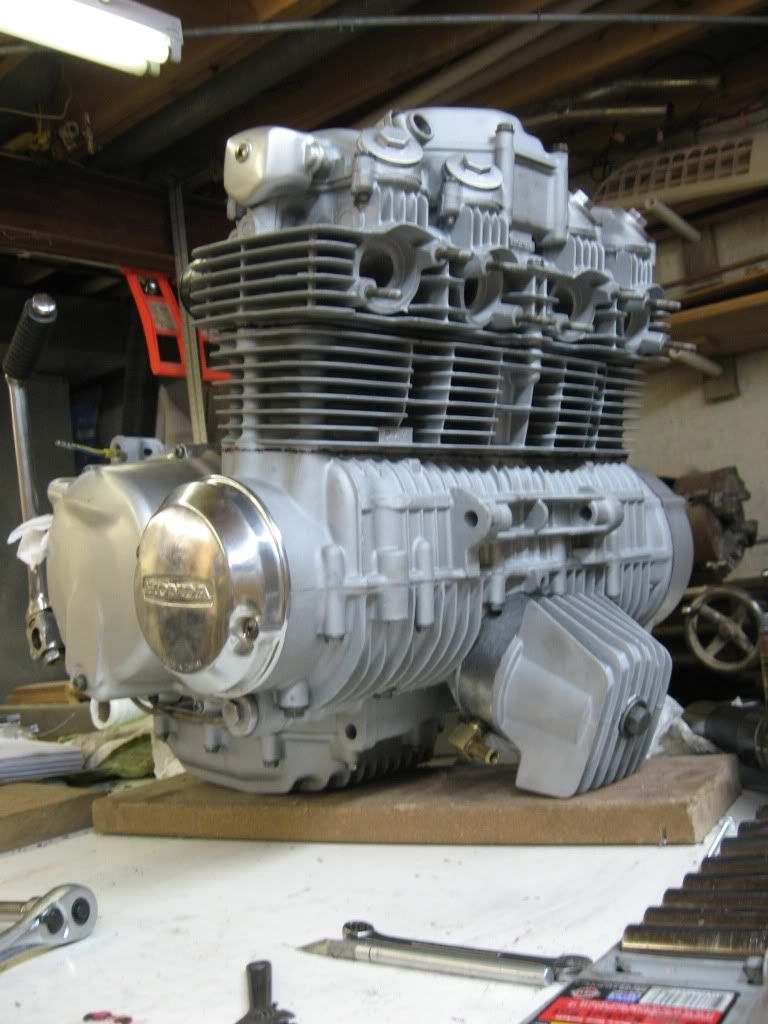
    Rebuilt the engine. That's my dad's lathe in the back. Maybe he'll give it to me someday.

    Photobucket
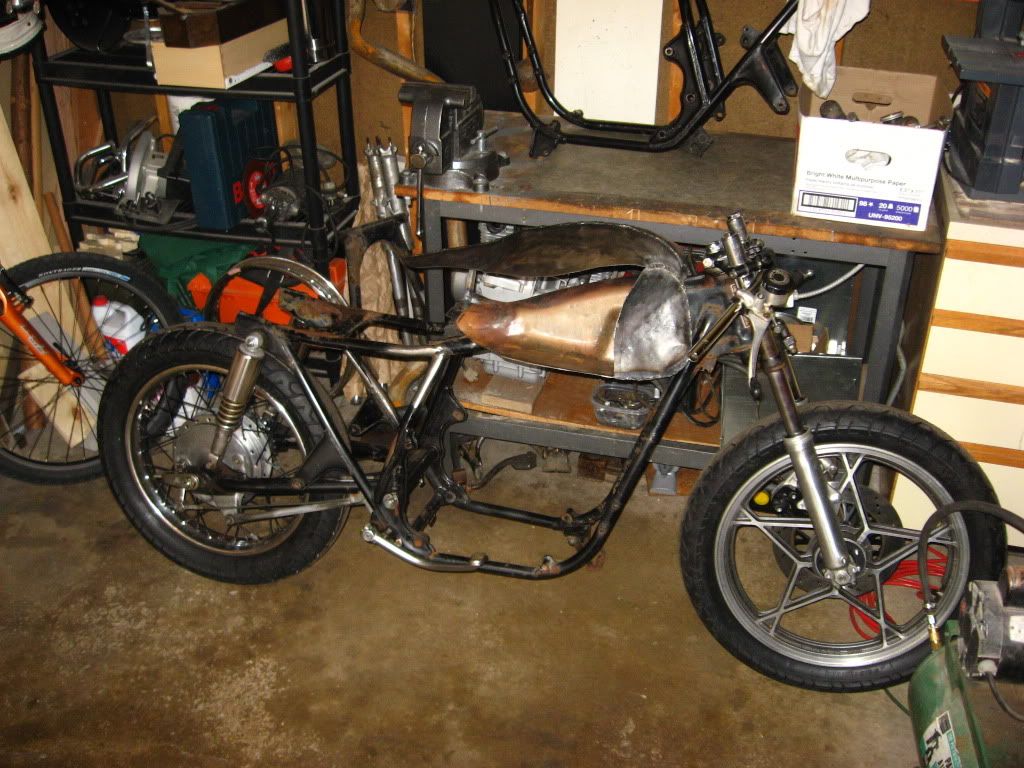
    Rolling frame. I put a Suzuki mag wheel on the front and left the rear stock. Tank is beginning to take shape here.

    I have more to come, but I'm playing catch up. I only recently found ChopCult, great site for builders who get trapped behind desks for big chunks of the day. Hope ya'll enjoy, I welcome all comments, criticisms, suggestions, and especially electrical help .
  • SoNorthCustoms
    Senior Member
    • Dec 2010
    • 208

    #2
    That tank looks like it will make a nice hole in your guts.

    Comment

    • Demoto
      Senior Member
      • May 2011
      • 173

      #3
      Yeah, my wife made a comment. Something about wanting children in the future. It looks like this now:

      Photobucket
      Last edited by Demoto; 07-13-2011, 9:01 AM.

      Comment

      • Demoto
        Senior Member
        • May 2011
        • 173

        #4
        Had a chance to mount my oil cooler and turn a shifter knob over the past few weeks. Here's the details:

        Photobucket
        Got my dad's antique machine lathe back up and running (yes, those are leather belts), and spun up a bar of stainless I found on the ground at work.

        Photobucket
        Here's the end result. Tilt your head to the right for a more accurate view. This was my first serious attempt at using a machine lathe since I decided to make my own gun at the age of 14 (which did not pan out well).

        Photobucket
        On to the oil cooler mounts. I had to roll my bike on the side and drop the suspension to get a decent angle to weld on. I left the swing arm on so I could make sure I had good tire clearance. It's close, but it won't hit.

        Photobucket
        Here are my two brackets welded onto the frame. I made them out of scrap steel and some welded in nuts so that I can just thread a bolt into them without trying to hold the nut on the other side. This has got to be my favorite kind of mounting system. Neat, clean, cheap, and easy to work on.

        Photobucket
        Here's the final product. I know it won't get too much air there, but the CB550 shouldn't require excessive cooling, and my ankle and foot on the peg should cause enough turbulence to keep the air moving around it.

        I hooked it up using hose and copper tubing. Up now: Electronics

        Photobucket
        I'm confused already

        Enjoy the pics ya'll
        Last edited by Demoto; 07-13-2011, 9:16 AM.

        Comment

        • hellbilly1932
          Senior Member
          • Aug 2009
          • 542

          #5
          as far as the electrics go, make you life a whole lot easier and through out the stock harness and start from scratch. You don't need much.

          Bikes looking good so far.

          Comment

          • Demoto
            Senior Member
            • May 2011
            • 173

            #6
            Thanks for the great advice and encouragement. I'm definitely leaning toward scratch building the harness. I've got some basic electrical knowledge, so it should be doable. the charging system is my main worry. Lot's of little metal boxes with wires coming out of them...

            Comment

            • Demoto
              Senior Member
              • May 2011
              • 173

              #7
              Took a few seconds this weekend to wrench on the bike a bit. Attached the final tail piece assembly, and mounted all of my electrical components.

              Photobucket
              The tail is complete! Just need to wire up the LED array that will be be my combination running/brake/signal light, and somehow make it water tight.

              Photobucket
              My under engine oil lines, snugged together with a sweet stainless steel assembly someone abandoned on the ground. Their loss, my gain.

              Photobucket
              Rectifiers, regulators, and all the other good stuff, now securely mounted under my seat. I had to make a trick hinged bracket for the rectifier (upper right corner of the pic, where you see a nut on a stap of steel, hinge is welded to the right of that nut) to keep it low porfile under the seat, yet still allow for me to bolt it in. I'm sure there was a better way to do this, but my brain is lazy sometimes.

              Enjoy the photos. Thanks to all who looked at my humble build and gave me input. Keep on building folks.
              Last edited by Demoto; 07-18-2011, 5:59 AM.

              Comment

              • Demoto
                Senior Member
                • May 2011
                • 173

                #8
                The Steel Steed moves forward, slowly but surely. I took some good advice and ran an all new wiring harness and saved a little bit of cash by reusing the wire from the old harness. There's a whole lotta extra wire in those things...

                I fabbed up a few small parts for the ignition mount and a couple of idiot lights (what can I say, I'm an idiot).

                Photobucket
                Here's my ignition switch mount. I made it nice and curvy to blend it into the frame and give it some attitude. I've noticed something: that the difference between a good custom and a great custom is the amount of time, effort, and thought that is put into the small pieces as well as the big ones. I tried to do a bit of that here.

                Photobucket
                ...It paid off in my opinion. The mounting location is convenient, and it looks nice to boot. Too bad I can't weld pretty.

                Photobucket
                My idiot light mounts, in stunning matte black.

                Photobucket
                I tapped holes into the triple tree upper where I ground off the handlebar mounts (I'm running clip on's). I'll use these to bolt on my lights.
                You'll notice that I have one bolt on the right and two on the left. Well, my tap sheared off in the center hole on the left side, so I had to get creative. I like how it looks, being a fan of asymetry. Someone will hate it though.

                Photobucket
                Idiot lights mounted and ignited. The wiring went a lot easier than I thought it would be, and was actually a lot of fun.

                Photobucket
                My dad and I (and the hound) worked to fire up the Steed last night, but to no avail. we are missing at least one important piece of the combustion triangle: Ignition. I'll be seeking out new coils, plug wires, points and condensers this week. I figured I'd rather have them all fresh instead of playing a guessing game. No problem money can't fix...

                Later folks.
                Last edited by Demoto; 08-01-2011, 5:45 AM.

                Comment

                • Spade115
                  Senior Member
                  • May 2010
                  • 2261

                  #9
                  When you get some time can we get a write up on how you did the lights, That looks awesome.

                  Comment

                  • BrandonThePleb
                    Senior Member
                    • Feb 2011
                    • 529

                    #10
                    im definitely digging your approach on the idiot lights. it's different

                    Comment

                    • Demoto
                      Senior Member
                      • May 2011
                      • 173

                      #11
                      Thanks folks. I appreciate the encouragement, and sure, I'll put together a writeup on how I cobbled these together. Give me a couple days to get photos together.

                      Comment

                      • Demoto
                        Senior Member
                        • May 2011
                        • 173

                        #12
                        Well folks, it's been quite the summer, and at least here in the Midwest, it's wrapping up. My goal of having the steel steed fit to ride for the fall has sadly fallen through. Too many parts to fab, too many bills to pay.

                        However, the great work progresses. I got her started, and that, I must say, was awesome. As soon as I sorted out some basic issues with the points, I added gas from my home-made fuel cell, and it fired up on the second flip of the switch.
                        And did she ever fire up. It sounded like the very gates of heaven were being thrown open. Power, fury, and about ten inches of flame scavenging from the exhaust tip.
                        I'm gonna have to play with timing and fuel mixture, or I might have to chenge my bike's name to "The Valve Chef", but she starts, and for now, that's all that matters.

                        Photobucket
                        Me and my buddy, on Starting Day. She was not a huge fan of the noise, but she's pretty chill otherwise.

                        Photobucket
                        My home-made fuel bag that I use for starting and carb balancing.

                        After starting the engine, I felt a bit listless for a while. I've been looking forward to hearing that engine run for almost four years now, and now that it had been achieved, what else was there to do?
                        The answer, A LOT.

                        I've got a huge list of all the tiny parts I need to make, buy, or find to get this thing road worthy. It's intimidating, especially since this is my first build. But I keep on checking items off the list. My most recent sub-project was lining the underside of the tail piece. It was made of thin steel, and looked a bit cheap if you got close to it, so I took an old computer case, stripped the paint, and cut it into strips. I then used the metal strips and my handy MIG welder to create a sort of woven look under the tail piece. the results are as follows:

                        Photobucket
                        Here's the top of the tail section. I've made some decorative indetations in it that will factor into the final finish of the bike. You can see a bit of the lining I installed on the bottom sticking out of the top. That will be cut down flush and I'm going to install a hinged compartment in there for registration papers and such.

                        Photobucket
                        The bottom of the tail section, with the 'woven' metal. I still need to hit the welds with a flapper wheel and get them to have a lower profile. But I'm not going to grind them out completely.

                        The body work is very close to complete. It's been a bigger task than I thought to fabricate everything from scratch. But now that I'm getting close to the end I'm thinking about finishing. I'm not doing paint, because metal is pretty, so I bought a POR 15 clearcoat to keep the rust at bay. I'm also going to decorate the bodywork with electrolytic etching. It did an experiment on a nose reinforcing plate I made for my longboard, so the etching on my bike will look something like this:
                        Photobucket
                        I've never seen anything like it before on a bike, but I'm really digging the style.

                        Enjoy!

                        Comment

                        • Bobbervirago
                          Junior Member
                          • Oct 2010
                          • 21

                          #13
                          lemme have your dog.. k thanks bai

                          Comment

                          • 650nutt
                            Junior Member
                            • Aug 2011
                            • 7

                            #14
                            fucking awesome dude, mad metal bashing skills going on there!

                            Comment

                            • EvilTwin500
                              Member
                              • Aug 2011
                              • 69

                              #15
                              I'm a big fan of doing something different and you really have a cool build going on! Keep up the good work!

                              Comment

                              300 mobile ad bottom forum

                              Collapse
                              Working...
                              ;